


26
•••••••••••••••••••••••••••••••••••••••••••••••••••••••••••••••••••••••••••••••••••••••••••••••••••••••••••••••••••••••••••••••••••••••••••
•
Various settings (continued)
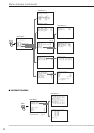
■ Data Clear Selection
This unit provides a menu which you can select the data
you want to erase.
Example: Clearing the data recorded on main HDD.
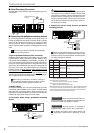
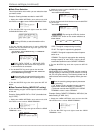
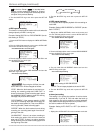
1. Display the <MENU SETTING> menu and turn the JOG
dial until the cursor( ) is next to “DATA CLEAR SELECTION”.
USER KEY
@DATA CLEAR SELECTION
REAR TERMINAL
2. Turn the SHUTTLE ring to the right to show the <DATA
CLEAR SELECTION> menu.
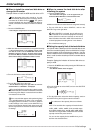
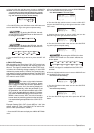
<DATA CLEAR SELECTION>
COPY DATA CLEAR OFF
ARCHIVE DATA CLEAR OFF
@HDD DATA CLEAR OFF
By turning JOG dial, to select the medium of the
data clear.
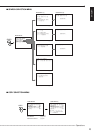
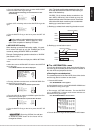
3. Turn the JOG dial until the cursor is next to “HDD DATA
CLEAR” and turn the SHUTTLE ring to the right. Turn the
JOG dial until “ON” flashes.
• The message, “Turn the SHUTTLE ring >> to EXECUTE.”
appears on the screen.
<DATA CLEAR SELECTION>
COPY DATA CLEAR OFF
ARCHIVE DATA CLEAR OFF
@HDD DATA CLEAR ON
“COPY DATA CLEAR” or “ARCHIVE DATA
CLEAR” appears on the screen when copy device
or archive device is connected.
4. Turn the SHUTTLE ring to the right to clear the data.
• If not executing, turn the JOG dial until “OFF” flashes and
turn the SHUTTLE ring to the right.
Please note that you cannot exit from the menu
when clearing the data and “ON” is flashing on the
screen.
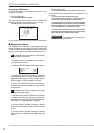
5. Turn the SHUTTLE ring to the left or press the SET UP
button.
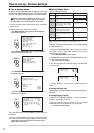
■ Rear Terminal Setting (MODE OUT setting)
With this setting, a signal can be output to send the status
of this unit.
Example: Setting MODE OUT to “PLAY” (the default set-
ting is “REC”).
1. Display the <MENU SETTING> menu and turn the JOG
dial until the cursor is next to “REAR TERMINAL”.
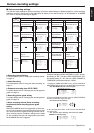
USER KEY
DATA CLEAR SELECTION
@REAR TERMINAL
SERVICE
2. Turn the SHUTTLE ring to the right to show the <REAR
TERMINAL> menu.
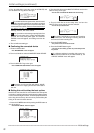
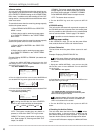
<REAR TERMINAL>
@MODE OUT REC
CAPACITY REMAIN HDD-10%
3. Check the cursor is next to “MODE OUT”, then turn the
SHUTTLE ring to the right.
• The sub-item will start flashing.
<REAR TERMINAL>
@MODE OUT REC
CAPACITY REMAIN HDD-10%
4. Turn the JOG dial until “PLAY” flashes and turn the SHUTTLE
ring to the right.
• The sub-item stops flashing.
<REAR TERMINAL>
@MODE OUT PLAY
CAPACITY REMAIN HDD-10%
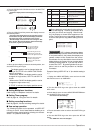
By turning the JOG dial, the item
of MODE OUT shown on the screen switches as
shown below:
REC PLAY POWER REMAIN
“REC”: The signal is output during recording.
“PLAY”: The signal is output during playback.
“POWER”: The signal is output when the unit’s power
switch is on.
“REMAIN”: The signal is output when the remaining
storage capacity of main HDD, archive device
reaches the rate which is set in CAPACITY REMAIN.
5. Turn the SHUTTLE ring to the left or press the SET UP
button.
♦ Capacity remain setting
When MODE OUT is set to “REMAIN” and the remaining
storage capacity of main HDD or archive device is running
out, this unit gives warning. The following shows how to
set the device and its remaining capacity ratio to give warn-
ing.
When the remaining storage capacity decreases
during recording:
• The display of the recorded storage capacity
flashes when “DISPLAY MODE 3” is selected.
• The buzzer sounds when BUZZER in the <REAR
TERMINAL> menu is set to “REMAIN”.
Example: Setting CAPACITY REMAIN to “HDD-50%” (the
default setting is “HDD-10%”).
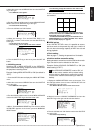
1. Display the <MENU SETTING> menu and turn the JOG
dial until the cursor is next to “REAR TERMINAL”.
USER
KEY
DATA CLEAR SELECTION
@REAR TERMINAL
SERVICE
2. Turn the SHUTTLE ring to the right to show the <REAR
TERMINAL> menu.