


28
•••••••••••••••••••••••••••••••••••••••••••••••••••••••••••••••••••••••••••••••••••••••••••••••••••••••••••••••••••••••••••••••••••••••••••
•
Various settings (continued)
♦ Buzzer setting
You can set to sound the buzzer when the remaining stor-
age capacity of the Hard Disk Drive reaches the amount
set in CAPACITY REMAIN setting on the <REAR TERMI-
NAL> menu. In addition to the above setting of CALL OUT
setting section, it is also possible to sound the buzzer when
other errors occur.
To sound the buzzer when the remaining storage capacity
reaches the preset amount.
1) Select “REMAIN” of BUZZER in the <REAR TER-
MINAL > menu.
2) Set the device and its remaining storage capac-
ity of CAPACITY REMAIN in the <REAR TERMI-
NAL> menu.
To sound the buzzer when the remaining storage capacity
reaches the preset amount or other error occurs.
1) Select “WRNG” of BUZZER in the <REAR TER-
MINAL> menu.
2) Set the device and its remaining storage capac-
ity of CAPACITY REMAIN in the <REAR TERMI-
NAL> menu.
Example: Setting BUZZER to “REMAIN” (the default set-
ting is “KEY”).
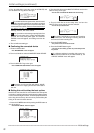
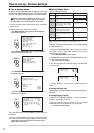
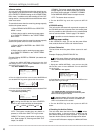
1. Display the <MENU SETTING> menu and turn the JOG
dial until the cursor is next to REAR TERMINAL. Then turn
the SHUTTLE ring to the right.
• The <REAR TERMINAL> menu appears.
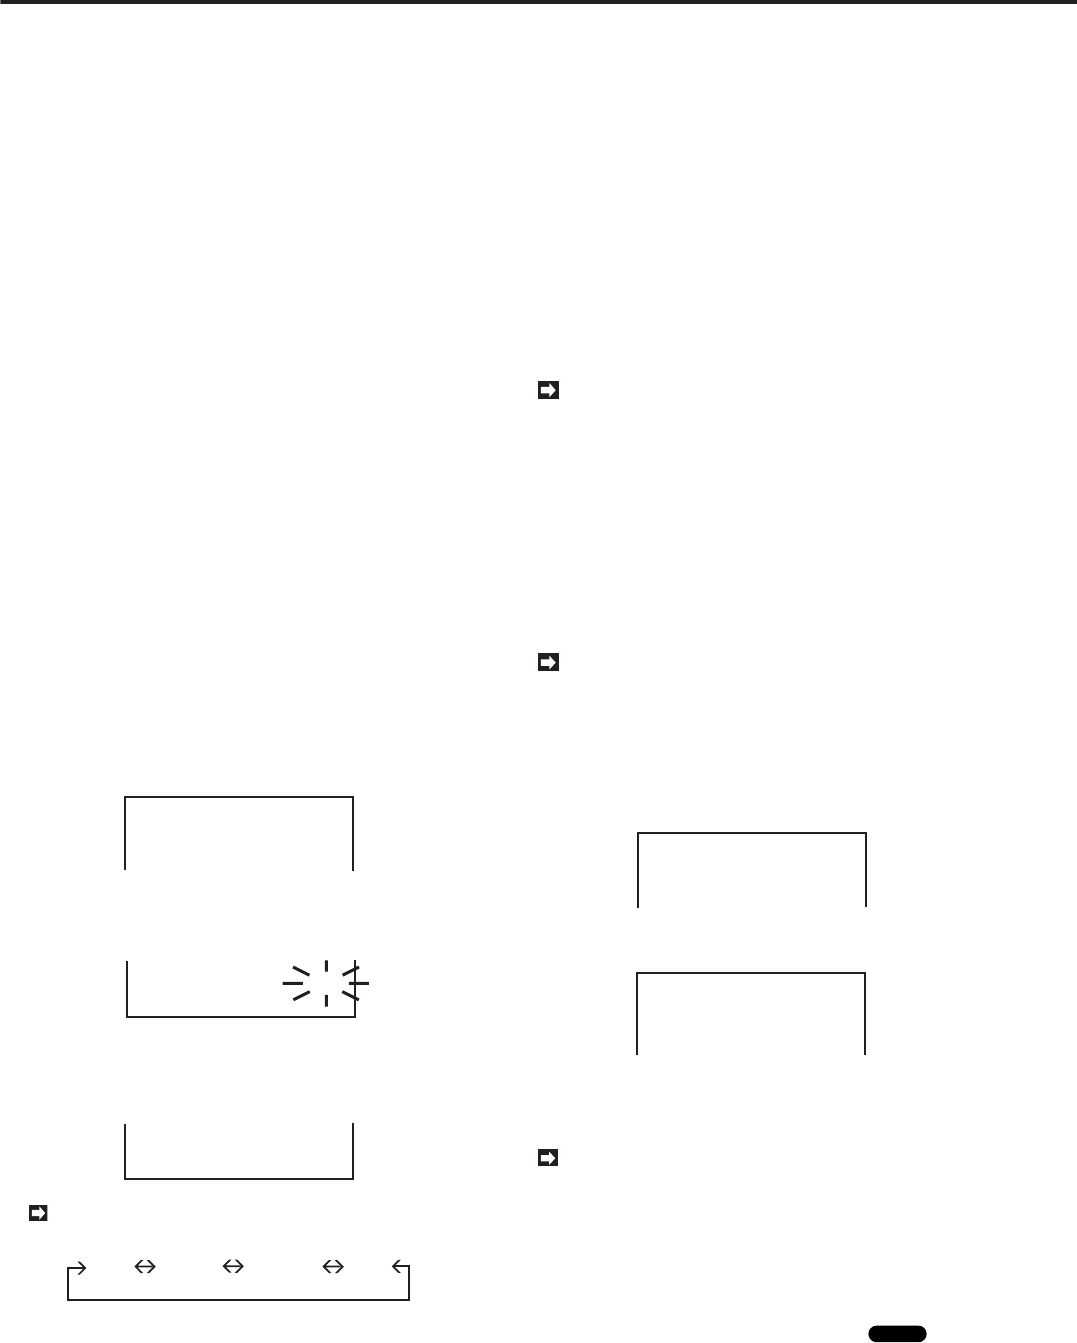
<REAR TERMINAL>
@MODE OUT REMAIN
CAPACITY REMAIN HDD-10%
CALL OUT
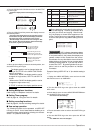
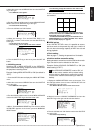
2. Turn the JOG dial until the cursor is next to BUZZER and
turn the SHUTTLE ring to the right to flash the sub-item.
CALL OUT
@BUZZER KEY
RS-232C SETTING
3. Turn the JOG dial to show “REMAIN” and turn the SHUTTLE
ring to the right to complete setting.
• The sub-item stops flashing.
CALL OUT
@BUZZER REMAIN
RS-232C SETTING
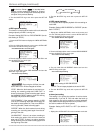
By turning the JOG dial, the item of BUZZER
shown on the screen switches as shown below.
KEY WRNG REMAIN OFF
“KEY”: The buzzer sounds when any button is
pressed, or JOG dial or SHUTTLE ring is turned.
“WRNG”: The buzzer sounds when a warning oc-
curs. Refer to page 75, “Warnings and CALL OUT
output”, for details.
“REMAIN”: The buzzer sounds when the remaining
storage capacity of main HDD and ARCHIVE reaches
the preset amount selected in CAPACITY REMAIN.
Press WARNING RESET button to stop the buzzer.
“OFF”: The buzzer does not sound.
4. Turn the SHUTTLE ring to the left or press the SET UP
button.
♦ RS-232C setting
This unit can be connected with a personal computer via
the RS-232C terminal to operate from the remote place
and it is possible to add information on the recorded data
such as sound and date. Refer to page 57 for details.
It is possible to record characters with images.
■ Service menu setting
In the <SERVICE> menu, you can see the power failure
time, reset the Archive Pointer and initialize menus.
♦ Power Failure list
The list of time when the power failure occurred is avail-
able.
Example: Displaying POWER FAILURE list.
Up to 50 power failure start times are shown on
the list. If more than 50 times, the last 50 start times
are shown.
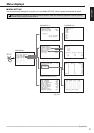
1. Display the <MENU SETTING > menu and turn the JOG
dial until the cursor is next to SERVICE. Turn the SHUTTLE
ring to the right.
• The <SERVICE> menu appears.
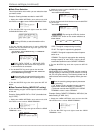
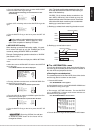
<SERVICE>
@POWER FAILURE
ARCHIVE POINT RESET OFF
MENU INITIALIZE OFF
2. Check that the cursor is next to POWER FAILURE and turn
the SHUTTLE ring to the right.
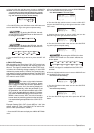
<POWER FAILURE>
No. DATE TIME INFO.
02 23-01-99 12:02 PW-LOS
01 25-01-99 12:35 PW-LOS
• The <POWER FAILURE> list appears on the screen.
• The number of times, the date and the time when the power
failure occurred are given on the list.
To reset the power failure start time, press the
WARNING RESET button when the <POWER FAIL-
URE> list is shown on the screen.
3. Turn the SHUTTLE ring to the left or press the SET UP
button.
♦ Resetting the Archive Pointer
This unit writes down the Archive Pointer
Glossary
where
the archive stops. In the next archive, it starts from the
point where the Archive Pointer is placed. If you want to
reset this Archive Pointer, follow the steps shown below.
1. Press the SET UP button to display the <MENU SETTING>
menu.