


100 Appendices
Appendix C: Lamp Cartridge Replacement, continued
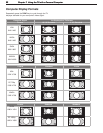
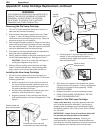
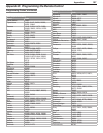
Figure 1.
WARNING
THECOVERISPROVIDEDWITHANINTERLOCKTO
REDUCETHERISKOFEXCESSIVEULTRAVIOLET
RADIATION.DONOTDEFEATITSPURPOSE
ORATTEMPTTOSERVICETHETVWITHOUT
REMOVINGTHECOVERCOMPLETELY.
Removing the Old Lamp Cartridge
1. TurnoffTVpowerandallowthelamptocoolforat
leastonehourbeforeproceeding.
2. Afterthelamphascooled,removethecover.Refer
tofigure1.Usea#2(large)Phillipsscrewdriverto
removethetwoscrewssecuringthecover.Keepthe
screwsandcoverforre-installation
3.
Withalargeflat-bladescrewdriver,loosenthetwoshiny
screwssecuringthelampcartridgeuntiltheydisengage
fromthematingthreads.Thesearecaptivescrewsand
cannotbeseparatedfromthelampcartridge.
4. Fullyopenupthebagsuppliedwiththereplacement
lampandsettheopenedbagaside.
5. Gentlygraspthehandleofthelampcartridgeandpull
theoldcartridgestraightout.Seefigures1and2.
CAUTION: Donottiltorrotatethecartridge,as
smallglassfragmentsmayfallout.
6. Withouttiltingorputtingdownthelampcartridge,
insertitintotheopenedbag.Closethebagwhile
beingcarefulnottoletanyglassparticlesfallout.
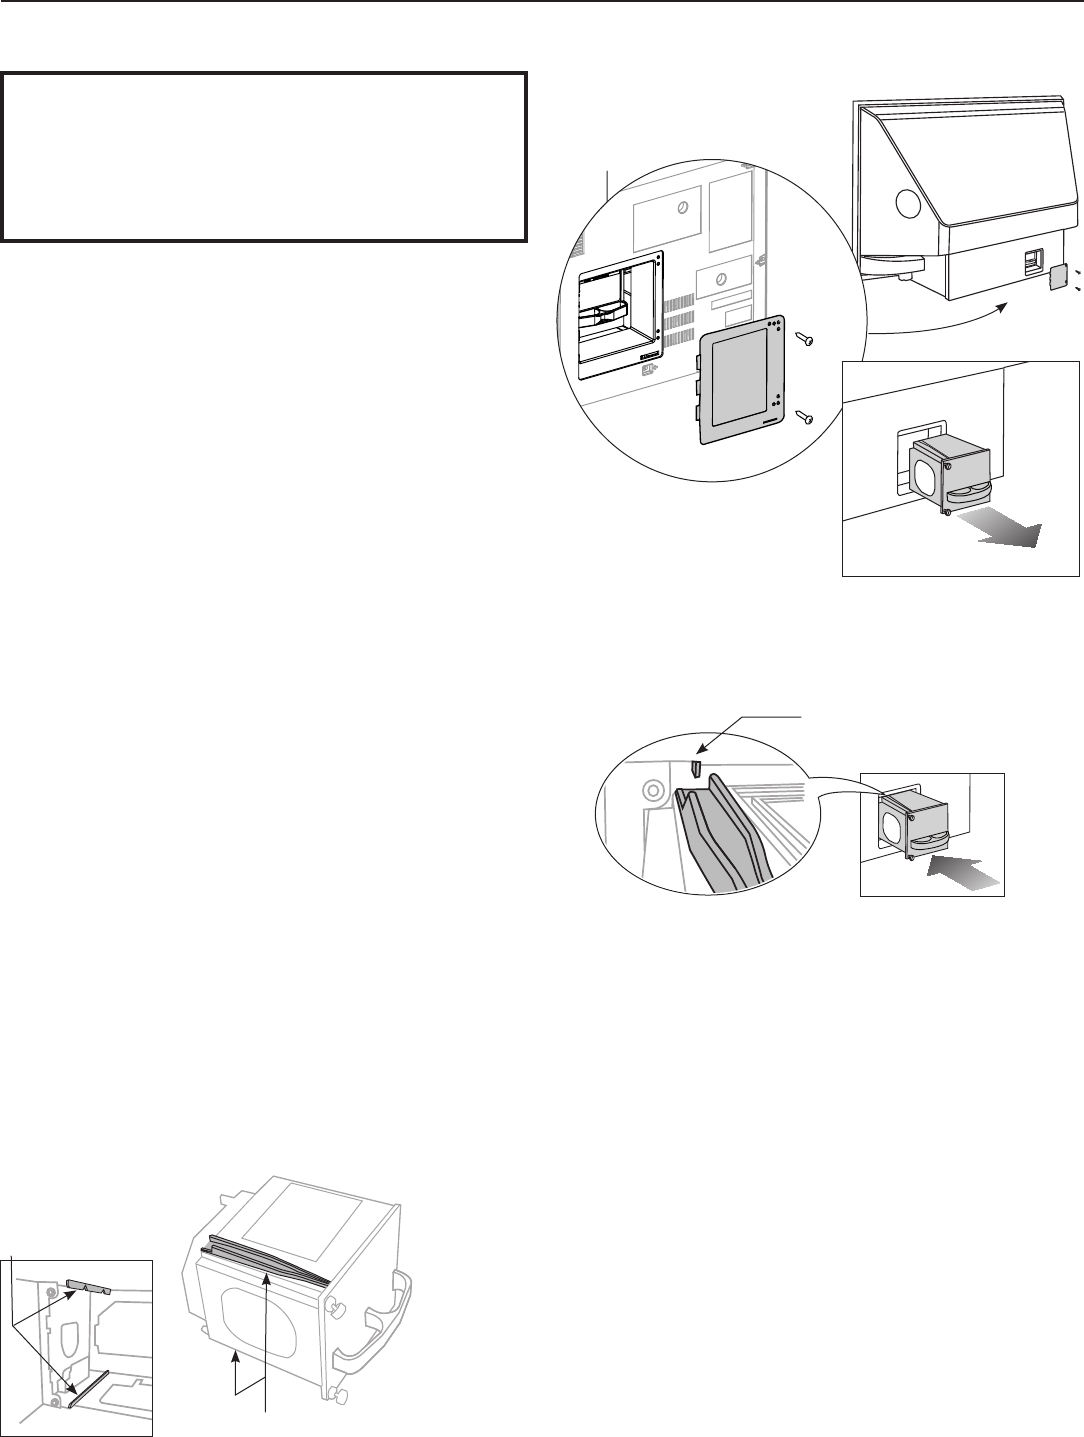
Installing the New Lamp Cartridge
1. Donottouchtheglasspartsofthenewlampcar-
tridge.InsertthenewcartridgeintotheTVusingthe
followingguidelines:
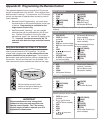
a. Refertofigures3and4andnotethelocationof
thetopandbottomguidesinsidethelampcom-
partmentandthecorrespondinggroovesonthe
topandundersideofthelamp.
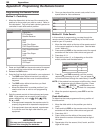
b. Holdthelampcartridgelevelwiththelampcom-
partment,orientedasshowninfigure5.
c. Alignthegroovesonthecartridgewiththetop
andbottomguidesinthelampcompartment.See
figure5.
Handle
(step 5)
d. Carefullypushinthecartridgeuntilitisfully
seated.Ifthecartridgedoesnotslidein
smoothly,gentlywigglethehandlefromsideto
sidewhilepushingin.
Figure 5
Guide in lamp
compartment
2. Witheitheryourfingersorthescrewdriver,gently
tightenthetwoshinyscrews.Ifusingascrewdriver,
useonlytwofingersforfinaltightening.AVOID
OVERTIGHTENING!
3. Replacetheplasticcoverandretainingscrews.
4. WASHYOURHANDSTHOROUGHLY,ASTHIS
LAMPCONTAINSMERCURY.
Disposal of the Old Lamp Cartridge
Lamp under warranty:Alllampsreplacedunderwar-
rantymustbereturnedtoMitsubishi.Usethereturn
shippinglabelprovidedandsendtoMitsubishiDigital
Electronics,America,1001CherryDrive,Suite2,Brasel-
ton,GA30517.
IMPORTANT: Lamps found to be without defect will
be returned and charged back to the sender.
Lamp no longer under warranty:
Contactyour
localauthoritiesortheElectronicIndustriesAllianceat
www.eiae.comforlamp-disposalorrecyclinginstructions.
Donotdisposeoftheoldlampwithcommontrash.
Figure 3
Figure 2
Figure 4
Guides inside the
lamp compartment
Grooves are on the top and
underside of the lamp cartridge