Chapter 3. TV Setup 39
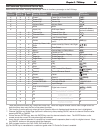
Cablebox
Camcorder
DVD
DVD2
DVR(digitalvideorecorder,recordableDVD)
Game
HD Disc (high-definitiondisc)
Satellite
VCR
ThenameyouassignherewillappearintheInput
Selectionmenuandcanbechangedlaterthroughthe
InputNamemenu.
Ifyouselectoneofthedevicenamescheckedin
thetableabove,theon-screenLearnbuttonwill
changefromgrayedouttofullcolor,indicatingthat
NetCommand“learning”isavailableforthedevice.
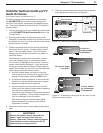
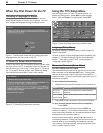
NetCommand
“Learn” button
(initially grayed out)
Name you
select for
the input
TV connec-
tion used for
this device
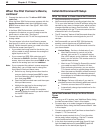
Figure 6. The Auto Input Sensing screen appears when a
device is first detected. Select a name for the connected
device in this screen.
3. Nowyoucaneither:
HighlightLearnandpress
ENTER
toperform
NetCommand“learning”forthedevice,ifappli-
cable(recommended).NetCommand“learning”
canbeusedtocontrolthedevicetypeschecked
intheprecedinglist.See“InitialNetCommand
Setup”laterinthischapter.Youcanperform
NetCommandsetupatalatertime,ifpreferred,by
usingtheLearnoptionintheNetCommandmenu.
Press
EXIT
toclosethescreen.TheTVwilldisplay
theAutoInputSensingscreenforthenextcon-
nectionitfinds.
Note: TocontinuewithNetCommandsetupforthecur-
rentdevice:
• Youmusthaveconnectedandproperlyplaced
NetCommandIRemitters(seechapter2,“TV
Connections”).
• Youmusthaveathandtheremotecontrolsfor
theTVandthecurrentdevice.
More About Auto Input Sensing
• Becarefultochooseadifferentnameforeachinput.
• Youcanchangetheinputnameatalatertimeusing
theInputNamemenu.
• Ifyoudisconnectadeviceandthenlaterconnecta
differentdevicetothevacatedjack,usetheInput
Namemenutoupdatethedevicename.Ifyouwant
thedeviceunderNetCommandcontrol,youmust
performNetCommand“learning”forthenewdevice.
• Antennainputs(
ANT 1/ANT 2)
,audioconnections,
andTVoutputsareneverdetected.
When You First Connect a Device,
continued
IEEE 1394 Connections
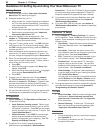
TheNew1394Devicescreenappearsifyouconnected
anIEEE1394device.Seefigure7.IEEE1394devicesare
automaticallyunderNetCommandcontrol.TheTVcan
recognizeuptosevenIEEE1394devicesatonetime.If
youconnectmorethanonedeviceofthesametype,a
uniqueidentifierisaddedtothenameforeachone.For
example,ifyouconnectthreeA/Vdiscs,youmayseeAV
Disc, AV Disc1, AV Disc2.
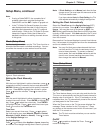
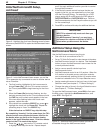
Figure 7. The New 1394 Device screen shows the device
name and includes a check box for an associated analog
connection.
IEEE 1394 Device with an Analog Connection
SomeIEEE1394deviceshavebothdigitalandanalog
outputstotheTV.Ifyouhavesuchadevice,placea
checkmarkintheAnalog Connectioncheckboxtoallow
youtousetheTV’sInputSelectionmenutoselecteither
theanalogordigitaloutput.
Forinstructionsonswitchingbetweenanaloganddigital
outputs,seechapter6,“NetCommandOperations.”
IfyourIEEE1394devicecanbeconnectedtotheTVwith
ananalogconnection,followtheinstructionsbelow.


