Chapter 6. NetCommand Functions 79
NetCommand-Controlled Recording
Thissectiondescribesmakingrecordingsindependently
oftheTVGuideOnScreensystem.Forinstructionson
settinguprecordingsusingTVGuideOnScreen,seethe
separateTV Guide On Screen® Interactive Program Guide
User’s Manual.
Recording from the Recording Setup Menu
Youcanscheduletherecordingtotakeplaceatalater
timeandprogramtherecordingdurationforaminimum
of30minutesandamaximumofsixhours(in30-minute
increments).Thedefaultisonehour.Duringtherecord-
ing,youcanviewadifferentdeviceorpowerofftheTV.
Immediate Recording from the Menu
1. Press (
RECORD
)toopentheRecordingSetupmenu.
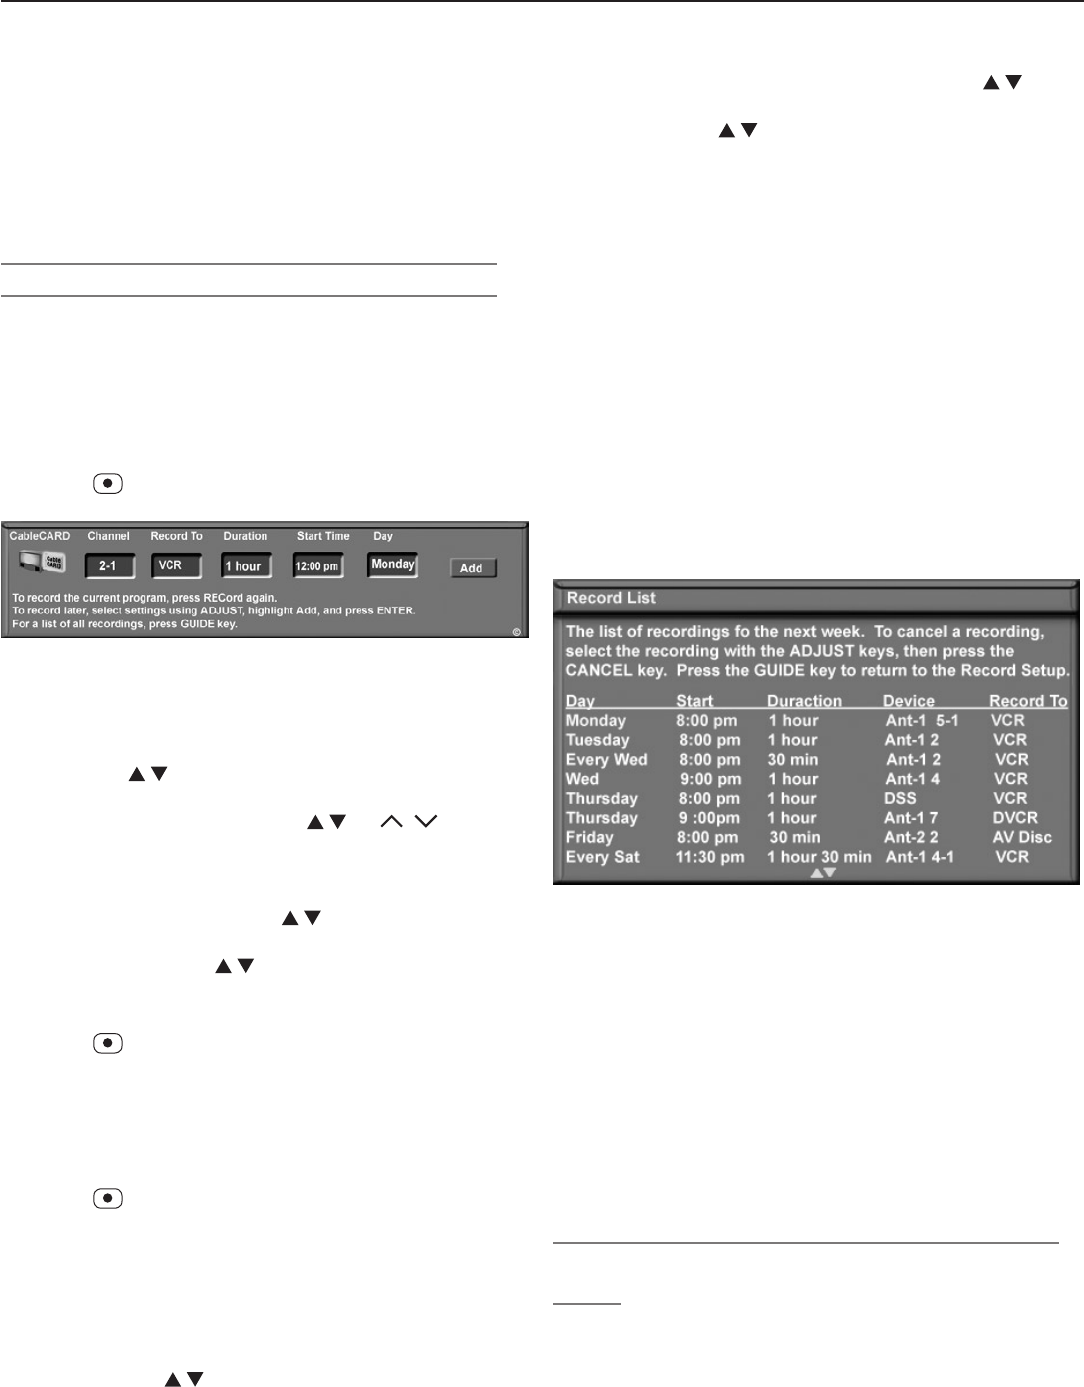
Figure 2. The Recording Setup menu
2. Reviewtherecordingsetupinformation.Movethe
highlighttoeachboxyouneedtochange.
• Withtheleftmosticonhighlighted(thesource),
press tochangethesourceinputifneeded.
• Channel.
Ifthesourceisanantenna,selecta
memorizedchannelusing
,
CH
/ ,orenter
thechannelnumberfromtheremotecontroland
press
ENTER
.
• Record To.Ifyouhavemorethanonerecordable
deviceconnected,use toselectitfromthe
listintheRecord Tobox.
• Duration.Use toselectarecordingduration
offrom30minutestosixhoursin30-minuteincre-
ments.Thedefaultisonehour.
3. Press
asecondtimetostartrecording.
Time-Delayed Recording from the Menu
1. EnsurethatTVEnergyModeissettoFast Power On
andtheTVclockissettothecorrecttimeandday.
UsetheSetupmenutomakechanges.
2. Press
(
RECORD
)toopentheRecordingSetupmenu.
3. Reviewtherecordingsetupinformation.Tochange
thesource,recordingdevice,orduration,followthe
stepsdescribedaboveunder“RecordingNow.”
4. Specifywhentostarttherecording.
• Start Time
a. Withthehourhighlightedingoldcharacters,
press toselectthehour,includingAMor
PM.Press
ENTER
tomovethehighlighttothe
minutes.
b. Withtheminuteshighlighted,press to
selecttheminutes.
• Day.Use toselectadayoftheweek.
5. SelectAddandpress
ENTER
toaddtherecordingto
theRecordList.Aconfirmationmessagewillbe
displayedifyourselectionissuccessful.Ifyoupick
overlappingtimes,day(s),ordestinationdevices,you
willseeamessagestatingthereisaconflict.
6. WhiletheRecordingSetupmenuisdisplayed,press
GUIDE
todisplaytheRecordList(seefigure3).Inthe
RecordListyoucanviewalistofscheduledrecord-
ingsandverifytheadditionoftherecordingtothe
schedule.Amaximumof32recordingscanbe
scheduled.
7. FromtheRecordListyoucan:
•
Press
CANCEL
todeletearecordingfromtheschedule.
• Press
GUIDE
toreturntotheRecordingSetupmenu.
• Press
EXIT
toreturntoTVviewing.
• Press
MENU
toreturntotheMainmenu.
Figure 3. Record List screen. From the Record menu,
press GUIDE to open the Record List to review or cancel
scheduled recordings.
TV Guide On Screen® and the Record List
ProgramsscheduledthroughTVGuideOnScreendonot
appearintheRecordList.RefertotheseparateTV Guide
On Screen® Interactive Program Guide User’s Manual
forinformationregardingschedulingrecordingswithTV
GuideOnScreen.
Ifthereisaconflictbetweenarecordingscheduled
throughTVGuideOnScreenandtheRecordList,theTV
GuideOnScreenrecordingtakespriority.
Recording from the ChannelView™ Channel
Guide
ChannelView™isavailablewhenTVGuideOnScreenis
disabled.ChannelViewprovidesprogramlistings,assent
bythebroadcasters,formemorizedchannelson
ANT 1
and
ANT 2
.Pressthe
GUIDE
keywhilewatching
ANT 1
or
ANT 2
toviewChannelViewlistingsandtosetupimme-
diateorfuturerecordingsasdescribedhere.


