48 C1696M (8/06)
ENHANCED SEARCH
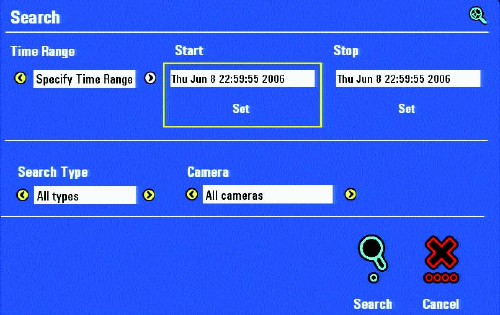
Figure 56. Search Dialog Box
You can use the Enhanced Search dialog box to search for recorded video based on the following search criteria:
• Date and time ranges: Search for video recorded in the following time periods:
– Yesterday: Searches the previous 24-hour period from the current date.
– Past 3 Days: Searches for video recorded in the preceding 3-day period from the current date.
– Past 7 Days: Searches for video recorded in the preceding 7-day period from the current time.
– Specify Time Range: Searches for video recorded during a time range that you specify. Selecting this option displays the Start
time dialog box.
• Types of recorded video: Search for video recorded based on motion detection or alarms, continuous or manual recordings, and
locked video.
– All types: Searches for all types of recorded video including locked, continuous, alarms, motion, and manual.
– Multiple types: Displays the Select Search Type dialog box in which you can select a subset of recorded video types for which
to search.
– Locked: Searches only for locked video.
– Continuous: Searches only for video recorded in the continuous mode (default).
– Alarms: Searches only for video recorded in response to an alarm event.
– Motion: Searches only for video recorded in response to a motion event.
– Manual: Searches only for video recorded manually.
• Specific cameras: Search for video recorded on all cameras, several cameras, or only a single cameras.
– All cameras: Includes all camera inputs in the search: 4, 8, or 16.
– Multiple cameras: Displays the Select Cameras dialog in which you can select a subset of cameras to included in the search.
displays the list of cameras. By default, the list is named Camera 01 to Camera 16 for a 16 channel DVR5100.


