Applications
62
Auto Detect Setting
You can assign an IP address to each camera and configure
various settings concerning auto detect settings.
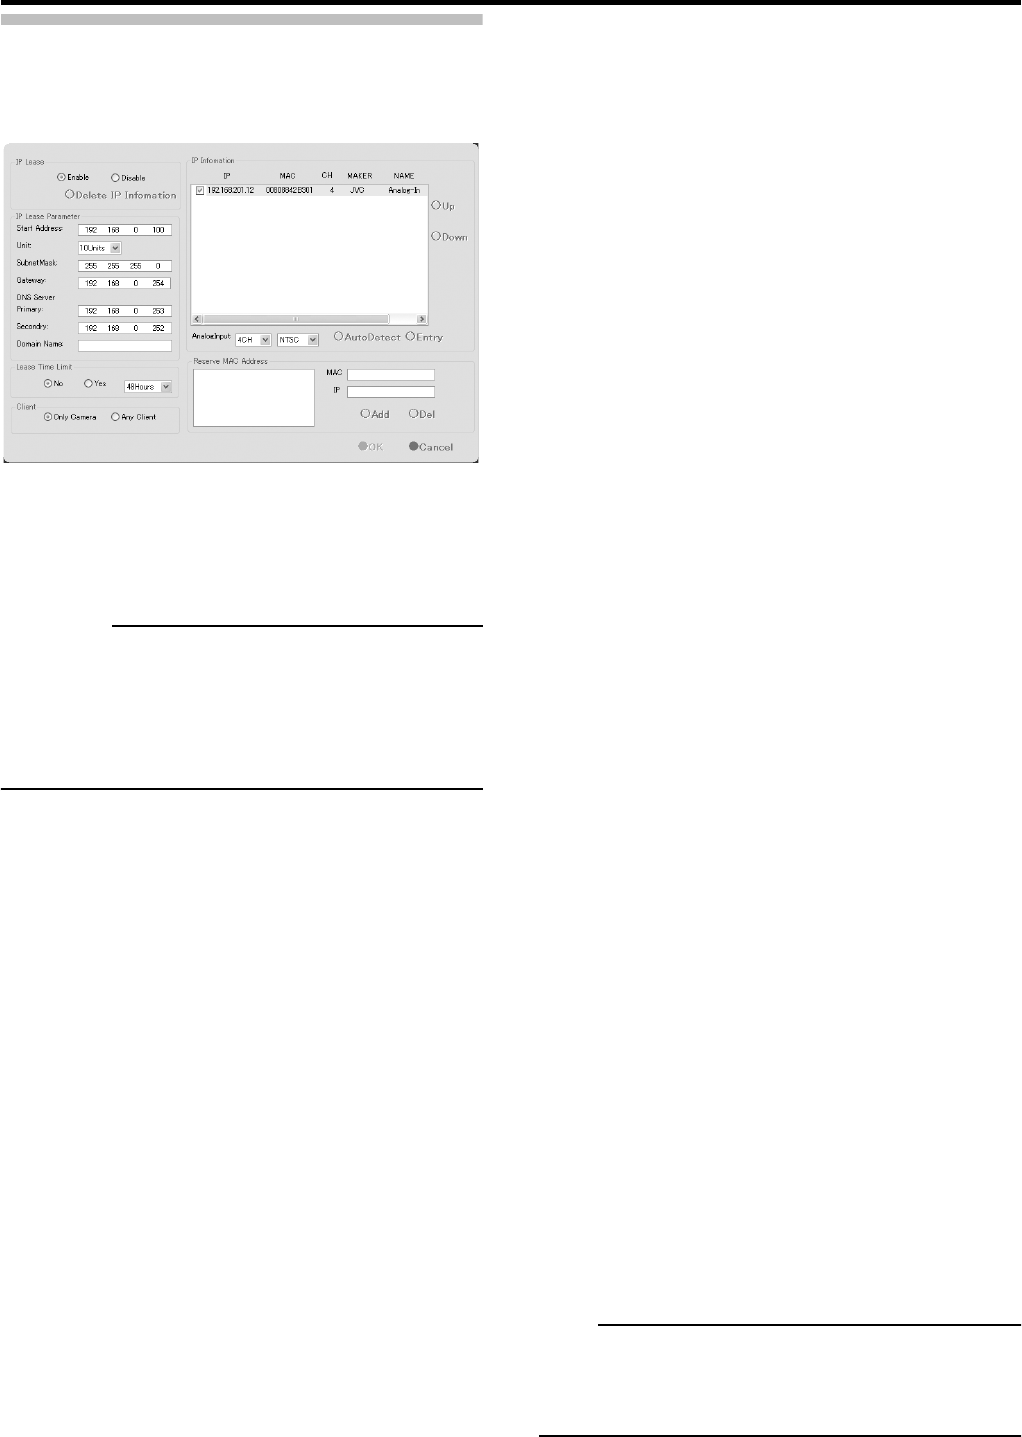
●IP Lease
Use this function to assign IP addresses to each network
camera.
CAUTION
• In order to allocate the IP address of the network camera
with the IP lease function, it is necessary to enable the
DHCP of the network camera. To enable the DHCP of the
network camera, refer to the instruction manual of the
network camera.
1 Select [Auto Detect Setting] from the Main
Menu.
The [Auto Detect Setting] window appears.
2 Select [Enable] for [IP Lease].
In an environment using multiple VR-N900U video
recorders, enable [IP Lease] only for one recorder. Select
[Disable] if a DHCP server is operating on the same
network. When more than 2 devices are enabled to the [IP
lease function] simultaneously, the cameras may
malfunction or the IP address may change to a static IP
address.
3 Make the required entries in the IP Lease
parameter fields.
[Start Address]
Specify the first of the IP addresses to be assigned to the
cameras.
[Unit]
Select the number of IP addresses to be assigned to the
cameras. The selected number of IP addresses will be
assigned starting from the first IP address.
[Subnet Mask]
Specify the subnet mask for the camera(s).
[Gateway]
Specify the gateway for the camera(s).
[DNS Server]
Specify the DNS server address for the camera(s).
[Domain Name]
Specify the domain name for the camera(s).
[Lease Time Limit]
Specify the validity period of the IP address assigned to
the camera(s). If [Yes] is selected, you can set the lease
time on an hourly basis.
[Client]
You can select whether to apply restrictions when
assigning the IP address. If [Only Camera] is selected, an
IP address will be assigned only to the camera. If [Any
Client] is selected, the IP address will be assigned to all
the cameras.
[Reserve MAC Settings]
Use [Reserve MAC Address] when you want to specify an
IP address for the cameras. An IP address is always
mapped to a MAC address. Enter a value in the MAC and
IP fields and click [Add] to set the addresses. Selecting a
displayed MAC and IP address and clicking [Del] will
delete this setting.
4 Click the [OK] button.
This closes the setup window and starts the assignment of
IP addresses.
Select [Disable] in step
2 to stop IP address assignment.
● Using the Auto Detect function
Automatically detects the corresponding network camera.
For details on the auto detect setting, refer to [Automatically
Registering the Cameras] in the startup guide.
• When multicast packets are not set to pass through the
network equipment(s) such as a switching HUB, the Auto
Detect of the camera, etc. may not operate properly.
• The [IP Information] list shows the automatically detected
camera IP address, MAC address, number of video
channels, maker name and model name. Click [Auto
Detect] to start auto detect and display the result. The
camera at the top of the list has priority. Click [Up] and
[Down] to change the order of priority. Deselect any
camera you are not going to use. [Analog-Input] is the
built-in analog input for the VR-N900U whose channels
have priority.
Click the [OK] button to open the [Camera Record Setting]
window. Clicking [Close] automatically creates a Default
View. To save this view, change its name.
Note
• The Default View created by the Auto Detect Setting may
change camera placement in the view. To maintain a
specific placement, assign a name to the view and save it.
[Auto Detect Setting] window


