


5
Part Names and Functions
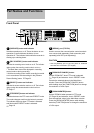
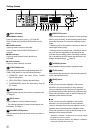
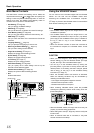
Front Panel
1
[OPERATE] button and indicator
Switches operation on or off. Press the button to turn
operation on and hold down the button to turn
operation off. The indicator blinks while the recorder is
starting up or shutting down.
2
[REC CONTROL] button and indicator
Switches the recording control mode on or off. The indicator
lights up when the recording control mode is set to on.
* The Main Menu cannot be displayed in recording
control mode or during recording.
* With the recording control mode, recording is carried
out in accordance with the settings in the [Camera
Record Setting] menu. Page 32
3
[SELECT] button and indicator
Switches the camera selection mode on or off. The indicator
lights up when the camera selection mode is set to on.
Page 17
4
[PTZ/PRESET] button and indicator
Switches between the PTZ mode and PRESET mode.
The mode changes each time the button is pressed.
The indicator lights up when PTZ mode is selected
and blinks when PRESET mode is selected.
Page 18
5
[SERIAL] port (TYPE-A)
Used to connect the communication control terminals
on a mouse (sold separately), flash memories (sold
separately) and UPS (sold separately).
CAUTION
• Use the [SERIAL] port on the rear panel for additional
hard disk drive connection. ( Page 8)
6
[ZOOM OUT/CANCEL] button
Selects ZOOM OUT when PTZ mode is selected
( Page 18) and selects a view in PRESET mode.
Cancels the selected values in the Main Menu
window. Press the [ZOOM OUT/CANCEL] button
while holding down the [FUNCTION] button to change
the resolution of VGA output.
7
[ZOOM IN/ENTER] button
Selects ZOOM IN when pressed in PTZ mode
( Page 18) and selects a view in PRESET mode.
Sets the selected values in the Main Menu window.
Press the [ZOOM IN/ENTER] button while holding
down the [FUNCTION] button to change the resolution
of VGA output.
1
2
3 4 5 6 7
☞
☞
☞
☞
☞
☞