


Basic Operation
18
Note
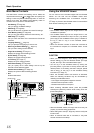
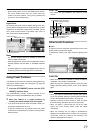
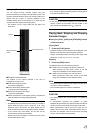
• When you select a particular camera, the blue bar at the
top of each live image becomes a lighter blue. Each bar
features the operating status of the camera and three
colored square indicators with the following functions.
➀ Event indicator (left indicator: solid yellow)
Lights up when events specified in the [Camera Record
Setting] occur. ( Page 58) Click the image bar to
reset the event indicator. The indicator appears black if
event indication has not been specified for the camera in
question, or if no specified events have occurred.
➁ Motion indicator (indicator in the middle, solid red)
Lights up when motion is detected.
➂ Online indicator (right indicator, blinking green)
Blinks every time an image is received from the
camera.
➃ Operating status of the camera (appears to the left of
the indicators)
LIVE (in green): when an image is displayed but not
recorded.
REC (in red): when recording.
STOP (in yellow): when an image from a camera
cannot be received or the camera is offline.
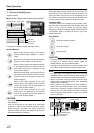
• The image bar displays the name of the camera as well as
the name of the device to which the camera is connected.
• Each image bar will display the word [Live] when live
images are displayed, and the word [Stopped] if the
camera is stopped and live viewing is not possible.
• To enlarge images from a particular camera in a view
using a mouse, double-click the image bar. To return to
normal view, simply double-click the image bar again.
• The event or motion indicator can also be canceled by
pressing the [ALARM CLEAR)] button.
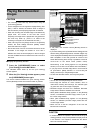
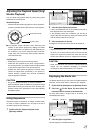
Using the PTZ Feature
PTZ stands for pan, tilt and zoom. If the camera is a PTZ
camera, you can use the keypad and the [ZOOM IN/
ENTER] button and [ZOOM OUT/CANCEL] button to move
the camera up, down (tilt), right and left (pan) and enlarge
the image (zoom).
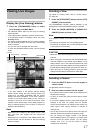
Pan/Tilt
1 Press the [PTZ/PRESET] button until the [PTZ/
PRESET] indicator lights up.
The [PTZ/PRESET] indicator switches between lit and
blinking each time the [PTZ/PRESET] button is pressed.
2 Press the arrow buttons on the keypad to
move the camera in the selected direction.
• Pressing the [HOME] (default) button on the keypad
moves the camera to its home position.
Zoom In/Zoom Out
1 Press the [PTZ/PRESET] button until the [PTZ/
PRESET] indicator lights up.
The [PTZ/PRESET] indicator switches between lit and
blinking each time the [PTZ/PRESET] button is pressed.
2 Press the [ZOOM IN/ENTER] button or the
[ZOOM OUT/CANCEL] button.
CAUTION
• The PTZ features are only available if the camera is a
PTZ camera. If the camera is not a PTZ camera, pressing
the button will have no effect.
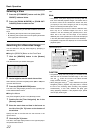
Note
• Many PTZ cameras may be controlled by pointing and
clicking inside the images from the camera. If you see a
set of crosshairs when placing your mouse pointer over
the images from a PTZ camera, point-and-click control is
supported for the camera.
• The camera cannot be operated in the [Image] window
when the mouse pointer does not change to the cross
shape pointer.
• The mouse pointer may not change to the cross-shape
pointer depending on the type of the PTZ camera.
• The PTZ camera may not operate even though mouse
pointer changed to the cross-shape pointer depending on
the PTZ camera. In this case, use the PTZ navigation
button of the [PTZ control] section to operate the PTZ
camera.
• For PTZ cameras, if your mouse is equipped with a scroll
wheel, you are able to zoom in and out using the scroll
wheel on your mouse.
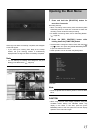
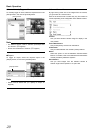
☞
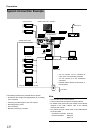
[Event] section
[PTZ Control] section
[Output] section
[Audio] section
➀
➁
➂
[Live Viewing] window
➃