


31
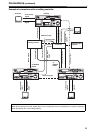
Automatic Editing (deck-to-deck) (continued)
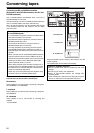
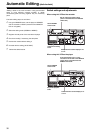
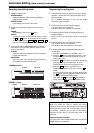
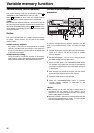
Selecting the editing mode
1 Select the editing mode.
ASSEM button:
Assemble (frame-to-frame continuity) editing is
performed in this mode.
INSERT button:
Insert editing is performed in this mode.
2 On the time code display, select the channels to be
edited.
ASSEM
Set ASSEM to ON using the button.
INSERT
To select V, A1, A2, A3, A4 and CUE channels, press
the to buttons; to select A5, A6, A7, A8 and
TC channels, press the + to +
buttons. The highlighted channels will now be edited.
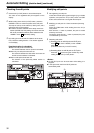
3 Press the PLAYER or RECORDER button to select the
VTR which is to be operated. (Settings when two VTR
units are connected.)
PLAYER
Press this button if the player VTR is to be operated to
register the edit points.
RECORDER
Press this button if the recorder VTR (this VTR) is to
be operated to register the edit points.
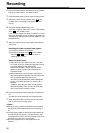
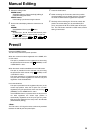
[ASSEM screen]
[INSERT screen]
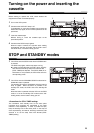
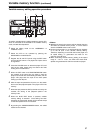
Registering the edit points
1 Locate the edit IN point by performing the jog or shuttle
operation. Set the tape to the still picture status at the
desired position.
For a detailed description of the jog and shuttle
operations, refer to page 28.
2 Press the IN button and SET button together.
The edit IN point is now registered.
The edit IN point value appears on the display.
3 Locate the edit OUT point by performing the jog or
shuttle operation.
Set the tape to the still picture status at the desired
position.
4 Press the OUT button and SET button together.
The edit OUT point is now registered.
The edit OUT point value appears on the display.
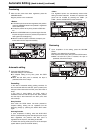
5 The edit points can be registered directly using the
number keys.
1. Select the <ASSEMBLE> or <INSERT> menu.
2. Press the button to highlight the edit point. Turn
the ADJUST dial to move the highlighting to the IN
point or OUT point.
3. Press the button again, and input the desired edit
point directly using the number keys. Turn the
ADJUST dial to move from one digit to the next.
4. Press the button to register the point.
To abort the registration at any time, press the
button.
To reset a particular edit point (to 00:00:00:00), press
the button, align the highlighting with the edit point
concerned, and press the button again.butt
Next, press the button and button together.
Finally, press the button to register the point.
F1
F1 F6
SHIFT F2 SHIFT F6
F1
SHIFT
F2 F3 F4 F5 F6
IN point
OUT point
F1
SHIFT
F2 F3 F4 F5 F6
IN point
OUT point
M
ar
k
er
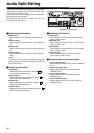
AUDIO IN point
AUDIO OUT point
Match frame processing function
When two VTRs are used to perform the editing
operations, there will be a total of 4 edit points: the IN and
OUT points for the player and the IN and OUT points for
the recorder. However, the last point is automatically
calculated so only three of the edit points need to be
registered.
Negative duration function
Use setup menu items No.300 (IN/OUT DEL) and No.301
(NEGA FLASH) in combination.
T
T
ENT
C
T
F 0
ENT
1, 32, 4
5