


55
Function menus (continued)
<CUE> (continued)
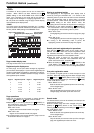
Cue point registration
Turn the ADJUST dial to highlight the point which is to be
registered. When the button is pressed, the current
tape position is registered as the cue point. The following
applies depending on the setting for (PAGE) on the
<CUE SHIFT> menu.
When “MANU” is set:
Operations are performed on the selected page. Press
the button to register the points in succession
(CUE¢1 > CUE¢2 > ... > CUE¢6) on the selected
page. (Any points already registered will be overwrit-
ten.)
The registration is automatically terminated when
CUE¢6 is registered on the page. (*
1
)
A change must be made to the points to be registered if
more cue points are to be registered. Check that the
cue point registration mode is established, change the
page, and change the points to be registered. In this
case, the search point will also move automatically to
the top (CUE¢1) of the changed page.
*1 If “ON” is selected as the ] (ROTATE) setting on
the <CUE SHIFT> menu, the registration of the cue
points will rotate on the same page in the following
order: CUE¢1 > CUE¢2 > ... > CUE¢6 >
CUE¢1 > CUE¢2 > ...
When “AUTO” is set:
When a page become full during the cue point registra-
tion process, operation automatically moves to the next
page, and registration continues. When CUE96 on the
last page is reached, registration is automatically termi-
nated. (*
2
)
A change must be made to the points to be registered if
more cue points are to be registered. Check that the
cue point registration mode is established, change the
page, and change the points to be registered. In this
case, the search point will not be changed.
*2 If “ON” is selected as the (ROTATE) setting on
the <CUE SHIFT> menu, the registration of the cue
points will rotate from page 9 (CUE96) to page 0
(CUE01).
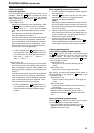
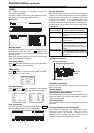
When registering cue points by number
1. Turn the ADJUST dial to highlight the desired registered
point display area
2. Press the button twice. Only the “10’s” hour digit of
the selected cue point is now highlighted, and the
change enable status is established.
<Note>
When “REV” has been selected as the setup menu item
No.144 (TC INPUT) setting, the input of the number will
start from the higher-order digit (it will be displayed start-
ing from the far right).
3. Input the number using the number keys. Movement
from one digit to the next is done automatically after one
number has been input. The desired digit can also be
selected by turning the ADJUST dial.
4. To enter the number, press the button.
When the display screen is switched or when the
button is pressed during the input process, the change
enable status is released, and the setting is canceled.
Clearing registered points
Clearing all the registered points together
When (AL CLR) on the <CUE> menu is pressed while
the button is held down, all the cue point data currently
selected is cleared. The range of the points which are
cleared is as follows depending on the setting for (PAGE)
on the <CUE SHIFT> menu.
When “MANU” is set:
All the points on the currently selected page are
cleared.
When “AUTO” is set:
All the points on all the pages are cleared.
After clearing, the search and registered points appear as
follows depending on the setting for (PAGE) on the
<CUE SHIFT> menu.
When “MANU” is set:
A return is made to the top (CUE¢1) of the page con-
cerned
When “AUTO” is set:
A return is made automatically to the top (CUE01) of
the first page.
* Points are cleared whether “ENTRY” (cue point
registration mode) or “SEARCH” (search mode) is
selected as the setting for [] (MODE) on the <CUE>
menu.
Clearing individual registered points
When the (CLR) button on the <CUE> menu is pressed,
the currently selected cue point data is cleared.
* The point is cleared only when “ENTRY” (cue point
registration mode) is selected as the setting for ]
(MODE) on the <CUE> menu.
SET
F3
SET
F4
F4
T
ENT
C
F5
F
F3
F3
F3
F4
F3