


67
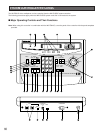
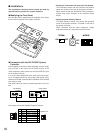
y Joystick Controller
The joystick is used to manually operate the Pan/Tilt
Head, move the cursor position in the setup menu of
the video multiplexer, or to select an area for Electronic
Zooming.
UP: Upward
DOWN: Downward
LEFT: Left
RIGHT: Right
u Iris Buttons (IRIS, CLOSE/OPEN)
Close or open the lens iris of cameras equipped with
the specified lens.
When these buttons are pressed at the same time, the
lens iris is reset to the factory default settings.
i Focus button (FOCUS, NEAR/FAR)
Adjusts the lens focus of cameras equipped with the
specified lens.
o Zoom button (ZOOM, TELE/WIDE)
Adjusts the lens zoom of cameras equipped with the
specified lens.
!0 Auto Focus button (AF)
This button is used to activate the auto focus function
when the camera equips with the specific feature.
!1 Camera (Set) key [CAM(SET)]
CAM: Used for camera selection. To select a camera,
enter the desired camera number with the Numeric
keys, and then press the CAM key.
SET: While displaying the setup menu on the monitor,
pressing this button will execute the currently high-
lighted selection and to enter a submenu in the
setup menu if the item has its own setting menu.
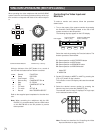
!2 Numeric keys (0-9)
These keys are used for numeric input into the system,
such as the camera number, preset position, etc.
!3 Monitor (Unit/Escape) key [MON(UNIT/ESC)]
This key is used to select a unit of video multiplexer.
Select a unit number with the Numeric key, then press
this key to select a specific Video multiplexer.
This key is also used to execute the settings and return
to the previous menu in the setup menu of the video
multiplexer.
!4 Still button (STILL)
This button is used to freeze the image currently dis-
played on the monitor screen.
!5 Preset Position Button (PRE-POSI)
This button is used to assign a preset position to a
specified camera.
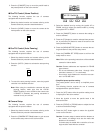
q Alarm Indicator (ALARM)
This indicator (Red) lights to indicate that an alarm con-
dition exists.
It goes off when the alarm is reset automatically.
To turn the ALARM indicator off of the multiplexer, press
the RESET button.
w Busy Indicator (BUSY)
This indicator lights to indicate that the system is locked
by PC command.
While this indicator is lit, control from the video multi-
plexer and system controller is disabled.
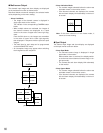
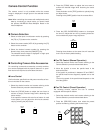
e Function buttons (F1/F2/F3/F4)
Selects functions displayed on the LCD (Liquid Crystal
Display) display.
F1: Operates the multiscreen monitor.
F2: Operates the spot monitor.
F3: Activates the sequence mode.
In this mode, a series of camera images is dis-
played in succession on the monitor screen for the
specified duration.
F4: Selects the camera image or VCR playback image
to be displayed on the monitor screen.
r LCD (Liquid Crystal Display) display
Displays the function menu and function status.
In this Instructions Manual, it is hereafter referred to as
the “LCD”.
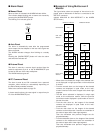
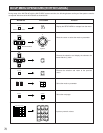
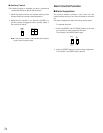
t Direction buttons (ADBC)
These buttons function as shown below.
Camera Set On button (CAMERA SET ON A)
This button is used to display the camera setup menu
on the monitor screen.
Set Up button (SET UP D)
This button is used to display the setup menu of the
video multiplexer.
Camera Set Off button (CAMERA SET OFF B)
This button is used to exit the camera setup menu dis-
played on the monitor screen.
Time Lapse Mode Buttons (T/L MODE, DC)
These buttons, in combination with the Alternate button,
select the time lapse mode of the time lapse VCR.
Press the D button to increase the recording duration
or the C button to decrease the recording duration.
Reverse Play button (REV A)
This button, in combination with the Alternate button,
activates reverse playback on the time lapse VCR.
Play button (PLAY B)
This button, in combination with the Alternate button,
activates playback on the time lapse VCR.