


WORKABOUT PRO Hand-Held Computer With Windows Mobile 6 Classic & Professional User Manual 19
Chapter 2: Basic Checkout
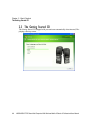
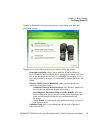
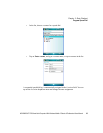
Using The SCU To Connect To The WLAN
• Type an SSID in the text box to the right of SSID. This field is limited to 32
characters.
• Tap on Commit and then, in the pop-up message, tap on OK to save your
SSID setting.
Important: To learn more about the other options available in the radio
attributes list, refer to “Config Tab” in Appendix A: Summit Client
Utility (SCU).
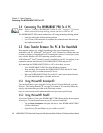
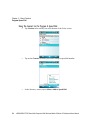
To configure authentication:
• Tap on the EAP type dropdown menu, and choose the appropriate type of
authentication – LEAP, EAP-FAST, PEAP-MSCHAP, and PEAP-GTC.
• Next, tap on the Credentials button, and type credentials for IEEE 802.1X
EAP types.
Important: Refer to “SCU Security Capabilities” and “EAP Credentials” in
Appendix A: Summit Client Utility (SCU) for details about security
settings.
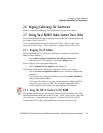
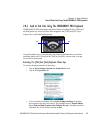
To configure encryption:
• Tap on the Encryption dropdown menu, and choose the appropriate type of
encryption – Manual WEP, Auto WEP, WPA PSK, WPA TKIP,
WPA2 PSK, WPA2 AES, and CCKM TKIP.
If you choose Manual WEP, WPA PSK or WPA2 PSK:
• Tap on the WEP/PSK Keys button. For Manual WEP, choose up to four
static WEP keys. For PSK, type an ASCII passphrase or hex PSK.
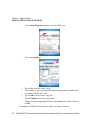
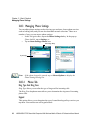
• Configure any other settings that are supplied by the network administrator
for the SSID to which you will associate.
• Make certain that you tap on Commit following each change.
Once you’ve completed the configuration:
• Tap the Main tab. Tap on the Active Config button – your new config will
be listed in the dropdown menu.
When you tap on the config you created, the RA2041 radio module attempts to con-
nect to the network using the following steps:
- Associate to the SSID.