


2-3MGP 462 • Installation
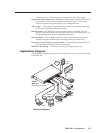
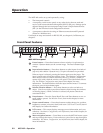
Connecting the MGP 462
The MGP 462 processor can be connected to as many as six input devices
simultaneously, and two output devices (displaying the same image). Follow the
steps below to set up the MGP 462 hardware.
1
Disconnect power to the MGP, and turn off all other devices that will be
connected.
2
If the MGP 462 is to be mounted, see Mounting the MGP 462, earlier in this
chapter, for the mounting procedure.
3
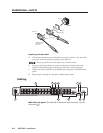
Using the BNC input connectors, attach up to six video input devices to the
MGP rear panel.
S-video and composite video inputs cannot both be connected to input 6 at the
same time.
4
Connect one or two output devices to the RGBHV/YUV BNC output
connectors and/or to the 15-pin HD connector.
5
If the MGP 462 will be connected to a computer or to a host controller for
remote control, connect the host’s RS-232 cable to the processor’s 9-pin
RS-232/422 D-sub connector.
6
Connect an active LAN Ethernet cable to the RJ-45 port on the rear panel to
establish a link to the network.
7
Power up the input and output devices, then connect power to the processor.
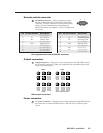
Installing or Replacing Button Labels
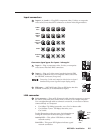
You may wish to customize your MGP’s buttons. The button caps are pre-labeled
for your convenience, but you can replace any of these labels with one of the
included button labels. You can also create custom labels using the Button-Label
Generator software (see Using the Button Label Generator in chapter 4, Software
Configuration and Control), or device such as the Brother P-Touch label maker. Cut
the labels so that they are square and ½ inch on each edge.
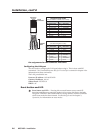
The button assembly consists of a clear lens cap, the button label, and a white
diffuser. (See the illustration on the next page.)
Follow these steps to replace button labels on your MGP:
1. Cut out the desired button label from the provided sheet, or make new labels
using the Button-Label Generator or other software and cut them out.
2. Remove the button assembly by inserting a small, flat-bladed screwdriver,
such as an Extron Tweeker, between the button’s base and the diffuser to
gently pry the button assembly off the button plunger.
3. Locate the small corner notch on the lens cap, and slide the screwdriver
between the lens cap and the diffuser. (See
a
in the illustration on the next
page.)
4. Using a rotating motion of the screwdriver, carefully pry the two pieces apart.
(See
b
in the illustration on the next page.)