


Quick Start — MGP 462, cont’d
MGP 462 • Quick StartQS-2
Quick Start — MGP 462, cont’d
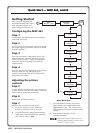
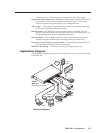
Main Menu flow
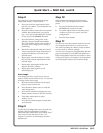
c. Press the Window/Image Size button
once, and turn the Adjust knobs to the
right until they stop. The window size
setting displays the same resolution as the
output.
d. Repeat steps a through c for the
remaining window.
With both windows at full screen size,
you must mute window 2 in order to set
window 1, and vice versa.
Power
on
Multi-Graphic
Processor
Input
Configuration
2 sec.
MENU
MENU
Output
Configuration
MENU
20 sec.
Window
Configuration
MENU
20 sec.
20 sec.
Default
Cycle
Extron
MGP 462 V2.01
2 sec.
Advanced
Configuration
20 sec.
MENU
MENU
NEXT
Exit Menu
Press Next
Window Text
Configuration
MENU
20 sec.
Background
Capture
MENU
20 sec.
Auto
Image
MENU
20 sec.
60 sec.
Configuring the MGP 462
Step 1
Use the Input Configuration menu to configure
each of the six inputs.
Step 2
Use the Output Configuration menu to configure
the output signal type and the output rate for the
desired resolution.
Step 3
From the Advanced Configuration menu, Test
Pattern submenu, select the Alternating Pixels
(Alt. Pixels) test pattern. Adjust your display’s
total pixel and phase settings for maximum
picture quality.
Step 4
From the Advanced Configuration menu, change
the test pattern to Crop, and adjust your
display’s positioning until all four sides of the
crop pattern are visible.
Adjusting the picture
controls
Step 5
Use the Window Configuration menu to select a
window border color for each window. This will
aid in window sizing and positioning.
Step 6
Select input 1 for both windows.
Step 7
Adjust windows 1 and 2 to full screen:
a. Press the Window 1 or the Window 2
button to select the window to adjust.
b. Press the Window/Image Position button
once, and turn the Adjust knobs until both
the H and V values = 0000.
Getting Started
After you have installed and
connected the MGP 462, follow
these steps to configure and
adjust it to get it ready for use.