


Configuration
Document 900.0856 Rev 3.00 73
11/07
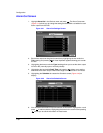
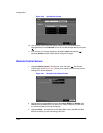
7. Highlight the box under the Channels heading and press to select which
cameras will be recorded.
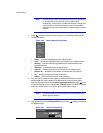
8. Highlight the box under the Settings heading and press to define the
recording settings. You can set the ips and Quality of the recording for any modes
you set up in the Mode column. If you do not set the ips and Quality in the
Settings column, the DVR will follow the default settings. See Figure 3-51 for
details.
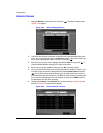
9. Highlight the box under the heading and press to delete the recording
settings. You will be asked to confirm that you want to delete the settings.
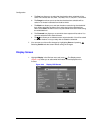
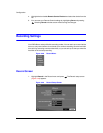
10. Highlight Default… and press . The Default screen appears.
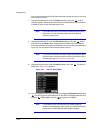
Figure 3-51 Default Setup Screen
11. Highlighting boxes under ips and pressing allows you to set the images per
second for Time and Event recording. You can select from 0.10 to 30.00 images
per second.
12. Highlighting boxes under Quality and pressing allows you to set the recorded
image quality for Time and Event recording. You can select from: Very High,
High, Standard and Low.
13. You can save your changes by highlighting Save and pressing . Selecting
Cancel exits the screen without saving the changes.
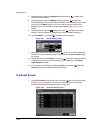
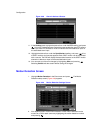
Pre-Event Screen
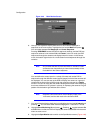
1. Highlight Pre-Event in the Record menu and press , and the Pre-Event setup
screen (Figure 3-52) appears. If you do not have Event set up in the Record
Schedule, a message will display alerting you to this fact.
Figure 3-52 Pre-Event Setup Screen