


Configuration
Document 900.0856 Rev 3.00 91
11/07
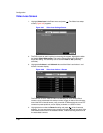
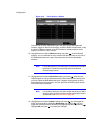
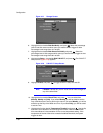
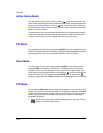
Figure 3-77 Storage Screen
6. Highlight the box beside Disk Bad Notify, and press . Select the percentage
level of bad disk sectors at which point you want the DVR to trigger an alert.
Percentage levels range from 10% to 90%.
7. Highlight the box beside Disk Almost Full Notify, and press . Select the
percentage level of disk usage at which point you want the DVR to trigger an alert.
Percentage levels range from 80% to 99%.
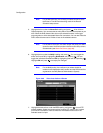
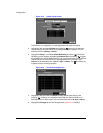
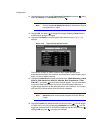
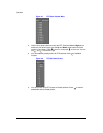
8. Highlight the Setup… box beside Disk S.M.A.R.T., and press . The S.M.A.R.T.
Setup screen (Figure 3-78) appears.
Figure 3-78 S.M.A.R.T. Setup Screen
9. Highlight Enable, and press to toggle S.M.A.R.T. Setup On and Off.
Note If Enable is turned Off, you will not be able to make changes to
any of the other fields.
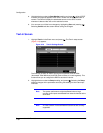
10. Highlight the box beside Check Time, and press . You can select from
Monthly, Weekly and Daily. If you select Monthly, you will be asked to set the
Day of the Month and Time to perform the check. If you select Weekly, you will be
asked to set the Day of the Week and Time. If you select Daily, you will be asked
to set the Time.
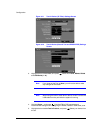
11. Highlight the first box beside Temperature Threshold, and press . Use the Up
and Down arrow buttons to scroll through the numbers. Refer to the hard disk
drive manufacturer’s documentation for the correct temperature setting. If the
temperature of the hard disk drive exceeds the defined threshold, the system
triggers an alert.