HD24/96 Technical Reference 87
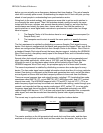
Network | Configuration | TCP/IP | IP Address
If you don’t see TCP/IP as a choice in the Configuration window (unusual for standard
installations), you’ll need to install it from the Windows installation disk. See “TCP/IP Is
Not Listed” below.
You may or may not have to make changes to the TCP/IP settings, depending on how
your computer is set up. If you use the computer in a network presently, or if you use it
to connect to the Internet, providing those are functioning normally, it is best to record
your current settings set the HDR24/96 accordingly. Changing network settings may
cause problems with your existing networking.
If the “Obtain an IP Address Dynamically” button is checked, you need not worry about
matching or conflicting with the HDR24/96 IP address. Your computer will find it even
though the IP Address and Subnet Mask settings on your computer are blank
If the “Specify an IP Address” button is checked and there is an address and subnet
mask displayed, jot those numbers down. You’ll need them to match up the HDR24/96
with your computer.
If the “Specify” button is checked but no IP address is displayed, you’ll have to make a
change. If the computer is not on a local area network and you aren’t planning to use it
to connect to the Internet, the simplest thing to do is check the “Obtain an IP Address
Dynamically” button and continue. You could enter an IP address of your choosing, but
for a simple, two-station network (the computer and the HDR24/96) there’s no
advantage to doing so.
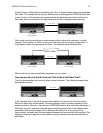
TCP/IP Is Not Listed
If the TCP/IP networking software is not installed, install it as follows:
Click the Add button.
Click Protocol and then click Add.
In the Manufacturer’s window, click Microsoft.
In the Network Protocols window, click TCP/IP, and then click OK.
Return to the Configuration window. You should now see TCP/IP listed.
Click the TCP/IP entry then click Properties.
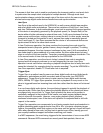
FTP Client Configuration
There are a number of FTP clients available for both PC and Macintosh platforms. This
generic example may not exactly reflect the settings for your particular FTP client software,
but it should be close enough to get you on the right track if you’re having difficulty.
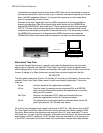
Create a new account for connecting to the HDR24/96.
If there is a “Profile” or “Account” name setting, choose a name like HDR.
For “Host” (Name/Address), use the HDR IP address you decided on earlier. In this
case the HDR IP address is 10.10.28.20.
If you must choose a “Host Type,” select “anonymous login”.
If there is a “Password” setting, you can leave it blank. The anonymous setting will
automatically send something that the HDR will ignore.
If there is a “Directory” setting, set it to “C”.


