


52
2. Track editing examples
Copying track data: Copy Track
The Copy Track command copies recorded track data
from the specified region (IN–OUT) to another location
(TO).
• You can copy the IN–OUT data not only once, but
multiple times in succession.
• You can copy not only a single track, but multiple
tracks simultaneously.
• By using the clipboard, you can copy track data to
another song.
This command can be used in the following ways.
• A phrase of several measures (such as a drum pat-
tern) can be copied repeatedly to create track data
for the entire song.
• The first verse of a song can be copied, and used to
create the second verse.
• A favorite phrase can be recorded on a track, and
copied for use on another track or song.
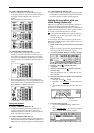
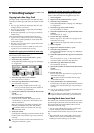
Procedure for copying a track within the same song
Here’s how to copy the IN–OUT region of track 1 to the
TO location of track 2 three times.
1 Register the IN, OUT, and TO times. (→p.97)
2 Select the Copy command.
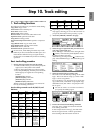
In the [TRACK] “EditTrk” tab page, set “EditType”
to “CopyTrack.”
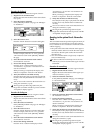
3 Select the copy source track number.
Set “SourceTrack” to track 1.
4 Select the copy destination track number.
Set “DestTrack” to track 2.
If you specify multiple tracks for the copy
source, you must specify the same number of
tracks for the copy destination.
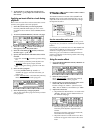
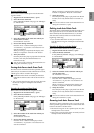
5 Specify the number of times that the data will be
copied.
Set “Times” to 3.
6 Execute the editing command.
Press the “Exec.” button. The display will ask
“AreYouSure?,” so press the “Yes” button to exe-
cute the command.
When processing is completed, the display will
indicate “Completed.” Press the “OK” button.
The data will be overwritten onto the copy
destination track.
7 Verify the results.
Press the [TO/LOC3] key to play back from the TO
location, and verify that the copy was performed
correctly .
You can use Undo to return to the state before exe-
cuting the command. (→p.99)
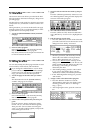
Procedure for copying to a track in a different song
Here’s how to copy the IN–OUT region of song 001
track 1 to the TO location of song 002 track 2, once.
1 Select song 001.
2 Register the IN and OUT times. (→p.97)
3 Select the Copy command.
In the [TRACK] “EditTrk” tab page, set “EditType”
to “CopyTrack.”
4 Select the copy source track number.
Set “SourceTrack” to track 1.
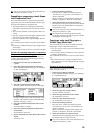
5 Select the clipboard as the copy destination track
number.
Set “DestTrack” to “Clip.”
6 Execute the copy command.
Refer to step 6 of “Procedure for copying a track
within the same song.”
The data in the clipboard will be overwritten.
7 Select song 002.
8 Register the TO time location. (→p.97)
9 Select the Copy command.
In the [TRACK] “EditTrk” tab page, set “EditType”
to “CopyTrack.”
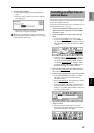
0 Select the clipboard as the copy source track num-
ber.
Set “SourceTrack” to “Clip 1.” The number indi-
cates the number of tracks in the clipboard.
A Select the copy destination track num.
Set “DestTrack” to track 2.
B Specify the number of times that the data will be
copied.
Set “Times” to 1.
C Execute the copy.
Refer to step 6 of “Procedure for copying a track
within the same song.”
The data will be overwritten onto the copy
destination track.
D Verify that the data was copied correctly.
Press the [TO/LOC3] key to play back from the TO
location, and verify that the copy was performed
correctly.
You can use Undo to return to the state before exe-
cuting the command. (→p.99)
If you are using an external drive, the data in the
clipboard will be erased when you switch drives.
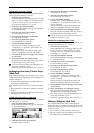
Inserting blank data: Insert Track
The Insert Track command inserts blank space into the
specified region (IN–OUT) of the recorded track. Track
data located after the inserted blank will be moved
toward the end of the song.
• You can insert a blank into not only a single track,
but into multiple tracks simultaneously.
This command can be used in ways such as the follow-
ing.
• This command can be used to add a phrase in the
middle of previously-recorded data, by inserting
blank space and recording your new data.
DestTrack TimesSourceTrack