


15
1
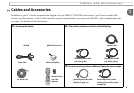
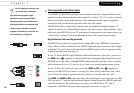
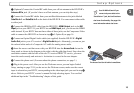
Setup Options
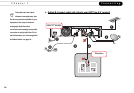
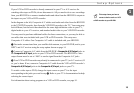
ᕡ (Optional) Connect the Coaxial RF cable from your off-air antenna to the HD DVR’s
Antenna RF In jack. (If you don’t have an off-air antenna, you can skip this step.)
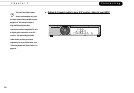
ᕢ Connect the Coaxial RF cables from your satellite dish antenna to the jacks labeled
Satellite In 1 and Satellite In 2 on the back of the HD DVR. You can connect either cable
to either jack.
ᕣ Connect the HDMI-to-DVI cable from the HD DVR’s HDMI Output jack to the DVI
Input jack on your HDTV. If your HDTV has an HDMI Input jack, you can use the HDMI
cable instead. If your HDTV does not have either of these jacks, use the Component Video
cable to connect the HD DVR as shown in step ᕣ of Option B, on page 16.
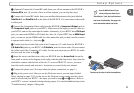
ᕤ Connect an Optical Digital Audio cable (not supplied) from the HD DVR’s Digital
Audio Out jack to your A/V receiver’s Digital Audio In jack. Alternately, you can use just
the red and white ends of a Composite A/V cable for analog stereo audio.
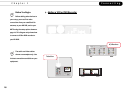
ᕥ Insert the access card that came with your HD DVR into the Access Card slot on the
front panel as shown in the diagram to the right (with the gold chip down). Stop when the
card makes contact with the back of the slot. To receive DIRECTV service, you must
insert the card correctly and activate it. Activation is covered in the next chapter.
ᕦ Connect the phone cord. (For more about the phone connection, see page 3.)
ᕧ Plug in the power cord. After you see the Welcome screen, you can begin Guided
Setup, starting on page 22. If you do not see the Welcome screen, make sure the correct
input is selected on your HDTV, corresponding to the video input jack you used in step ᕣ
above. Refer to your HDTV’s owner’s manual for help selecting inputs. You can find
additional tips in the “Troubleshooting” chapter of this guide.
Your HD DVR will work if you
connect only one cable to the
“Satellite In 1” jack, but it will not have
dual tuner functionality. See page 6 for
more information about dual tuner.
ᕥ
The Access Card slot is behind a small door.