


Configuration
Document 800-00918 Rev E 77
12/07
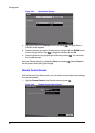
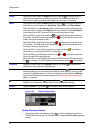
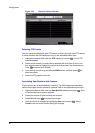
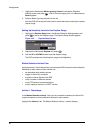
In the Alarm-In Settings tab, you can:
• select which alarm-in devices are active
• name the individual alarm-in device
• change the settings for each input (NO or NC)
• select alarm input associated with panic recording
Initial settings
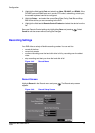
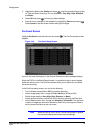
To turn each input On or Off, highlight the alarm number and press .
To give each input a title, highlight the desired Title field and press . A virtual
keyboard appears with which you can enter a title name.
Each input can be set as NO (normally open) or NC (normally closed). Highlight the
Type field, and press to toggle between On and Off.
You can set the DVR to start panic recording whenever the DVR senses an input from
one of the alarm input connectors.
1. Highlight the field beside Panic Record, and press . A list of alarm inputs
appears.
2. Select which alarm input you want associated with panic recording by scrolling
with the UP and DOWN arrows, then press .
Note If panic recording is triggered as a result of the settings from the
Alarm-In menu, then the DVR continues recording until input on
the selected alarm stops. You can also press PANIC on the DVR
to stop panic recording.
Setting the DVR Actions in Response to Alarm Input
You can set the actions the DVR takes whenever it senses an input from the alarm input
connectors.
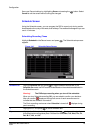
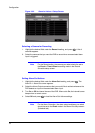
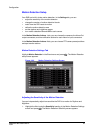
In the Alarm-In Actions 1 tab, you can choose the cameras, the Alarm-Out output
connectors, and the notification actions for each Alarm-In input connectors.
In the Alarm-In Actions 2 tab, you can choose PTZ camera preset positions and spot
monitor actions.
Actions 1 Setup Screen
In the Alarm-In Actions 1 tab, you can choose the cameras, the Alarm-Out output
connectors, and the notification actions for each Alarm-In input connectors.
Highlight the Actions 1 tab. The Actions 1 setup screens appear.