


Chapter 3 Preparations
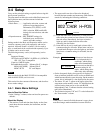
3-24 (E) 3-4 Setup
• Return the control to the center position
• Press the MENU control once
• Press the SETUP/BLACK button once more, turning the
PRESET indicator off
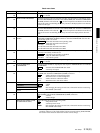
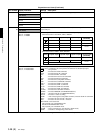
Menu items with submenus
The procedure for making settings in a menu including a
submenu is slightly different from that described above in
Section 3-4-2, “Basic Menu Operation”.
Menus including a setting submenu
This type of menu item has a number of parameters to be
set within a single menu item.
Use the following procedure in this type of menu.
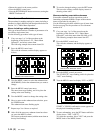
1
Carry out steps 1 to 3 of the procedure at the
beginning of this Section 3-4-2, “Basic Menu
Operation”, and select a menu item.
The following example shows menu item 034.
2
Press the MENU control once.
This calls the submenu, and the display appears as
follows.
3
Turn the MENU control to select the submenu item
(HOUR/MIN). Select the submenu item you want to
change.
4
Press the MENU control once more.
The menu item stops flashing, and in its place the
setting value starts flashing.
5
Turn the MENU control to change the setting value.
6
Here, to return to the submenu item selection, press
the VIDEO button.
The submenu item starts flashing again.
7
Repeat steps 3 to 6 above as required.
8
After all of the necessary submenu items have been
set, press the MENU control.
This returns to the main menu (with the menu item on
the top line flashing).
9
To save the changed settings, press the SET button.
This saves the settings, and the display returns to
showing a time value.
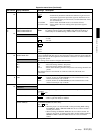
Menus containing executable submenus
Executable submenus perform operations such as
formatting replacement HDDs. Names of these menu
items are preceded by a hyphen, “–”.
Use the following procedure with this type of menu item.
See the next page for the procedure to use with menu
number 010.
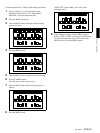
1
Carry out steps 1 to 3 of the procedure at the
beginning of this Section 3-4-2, “Basic Menu
Operation”, and select menu item 098, 099, or 027.
The following example shows menu item 027.
2
Press the MENU control once.
This calls the submenu, and the display appears as
follows.
3
Press the MENU control once more.
The “EXECUTE” stops flashing, and in its place the
“NO?” starts flashing.
4
Turn the MENU control to display “YES t [SET]”
When you have changed the indication to “1:
START,” a YES/NO confirmation screen appears for
the physical formatting operation.
5
To start reformatting, press the SET button while the
display shows “YES t [SET]”.
To cancel the operation, select “NO?” and press the
MENU knob or the MENU button.
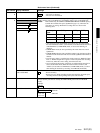
0 3 4 L I V E
HOUR
UDR
2
Submenu item “HOUR” flashes.
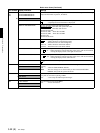
0 2 7 - F A S TB
EXECUTE
RE O TO
Submenu item “EXECUTE” flashes.
0 2 7 -
E XECU
[
S ET
]
TE YES
FAST BRE O TO