


4 (E) About This Operation Manual
Using this manual
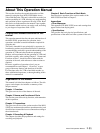
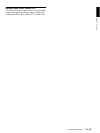
Descriptions of operating procedures
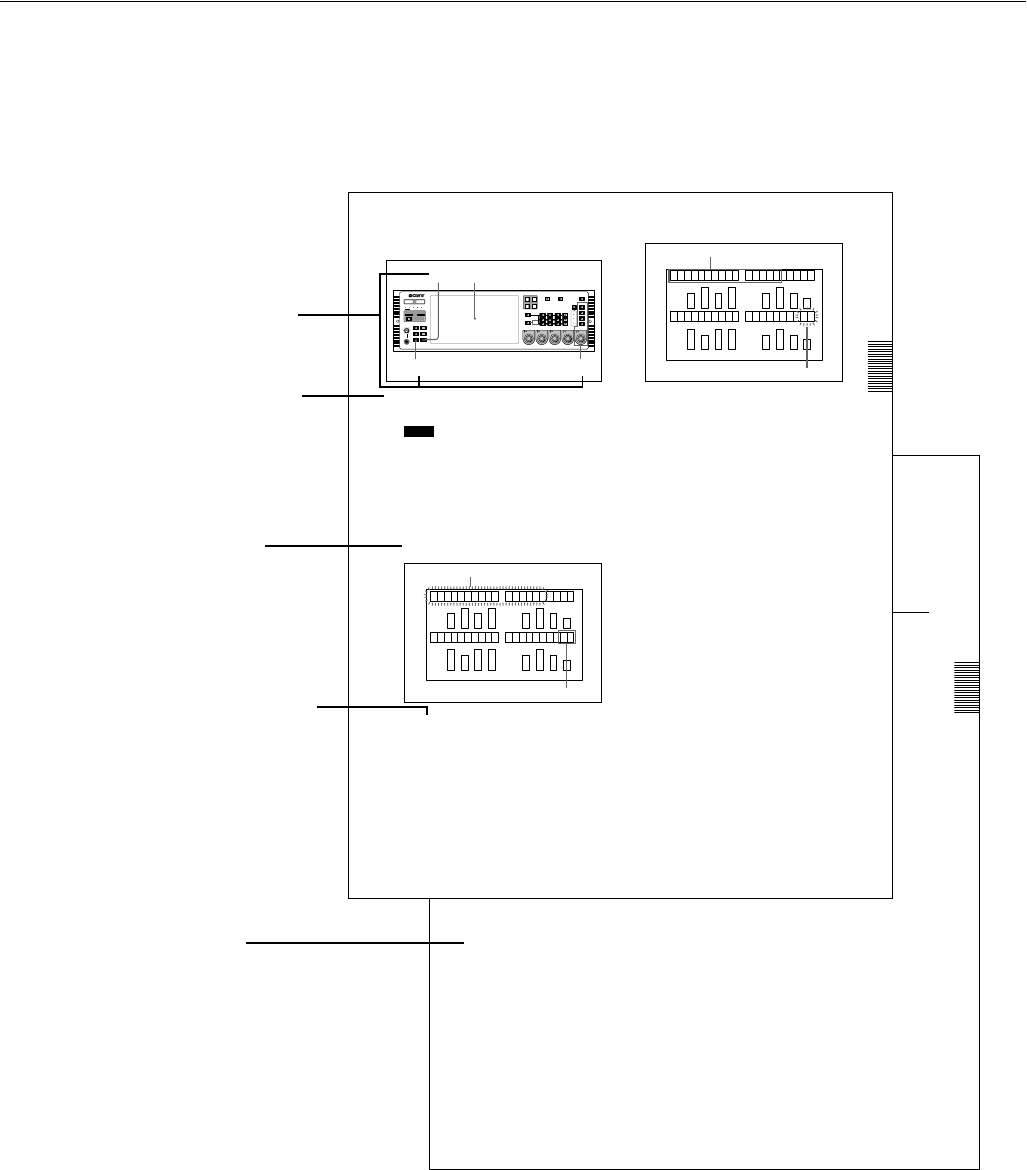
The numerals attached to buttons and switches in the
illustrations refer to corresponding step numbers in the
operating procedure. Additionally, affected switches and
indicators which should be checked are indicated.
The first time a technical term appears it is defined in a
footnote. Where required, a cross-reference (in italics)
shows the page in this manual or in another manual where
related information may be found.
Chapter 4 Recording & Playback
4-1 Preparations for Recording
4-3 (E)
CH2: Audio monitor output. Same as the Rch signal.
CH3: No output.
CH4: No output.
To adjust the volume of the audio output from the
PHONES jack
Turn the PHONES control.
4-1-6 Adjusting Recording Levels
Note
Before performing the following operation, please select
the applicable ports.
To adjust the recording level
When recording with a reference level
Press the AUDIO REC/PB LEVEL adjustment control, so
that the PRESET indicator lights. The audio signal is
recorded at the preset reference level (shown as reference
0 dB for an input of +4 dBm).
To record with manual adjustment
For each channel, press the AUDIO REC/PB LEVEL
adjustment control, so that the PRESET indicator goes off,
then adjust so that the average sound level produces an
indication on the level meter close to the 0 dB reference.
Changing the display range of the audio
level meters
By pressing the FULL/FINE button, you can switch the
audio level meter display range.
FULL display mode:
the meter display range is -60 dB to 0 dB or -40 dB to
+20 dB.
FINE display mode:
the meter display is enlarged, and a reference marker
lights in the center of the meter, with the display in 0.25
dB steps.
To select the display range in the FULL mode, use Expansion menu
item 802. See Section 3-4-3, “Contents of the Expansion Menu”
(page 3-26).
4-1-7 Selecting the External Device
Used for Controlling
Recording Operations
Use the following procedure to determine whether you
should use the optional control panel (BKMA-505) or an
external unit when recording with the MAV-555SS.
1
With the PORT SELECT buttons, select the recording
port to which the setting applies.
2
Press the REMOTE button, turning it on or off.
When lit:
The unit is controlled from the external unit
connected to the REMOTE IN (P1/P2) connector
on the unit’s rear connector panel.
When off:
This unit is controlled from the optional control
panel (BKMA-505).
4-1-8 Recording Analog Audio
Using the emphasis function
To record audio signals input to the ANALOG AUDIO
INPUT connectors of the BKMA-570 (optional), you can
use the emphasis function.
To activate the emphasis function, set EMPHASIS ON in
the Expansion menu (883 and 884).
For details of the Expansion menu, see Section 3-4-3, “Contents of
the Expansion Menu” (page 3-26).
On playback, for a signal to which emphasis has been
applied, regardless of the setting of the EMPHASIS
switch, de-emphasis processing is automatically applied.
Further, when recording digital audio signals (SDI or
AES/EBU), emphasis is set automatically according to the
input signal emphasis information. With this unit, this
information cannot be changed.
Chapter 3 Preparations
3-4 Setup
3-23 (E)
3-4-2 Basic Menu Operation
To change the factory default settings, proceed as follows.
1
Set the SET UP SELECT switch on the system setup
panel to the desired menu bank.
Note
When the menu bank is modified after power up, the
M AV- 555SS must be restarted or the FA ST REBOOT
(menu 027) on the Basic menu must be executed.
(Changes in settings made while the power is off do
not become eff ecti ve the next ti me the power i s turned
on. I t is necessary to start up the system a second
time.)
2
Press the MENU button.
A menu item appears in the time counter display in
the display panel.
3
Turn the M ENU control to select the i tem you want to
change.
Turning the MENU control clockwise increases the
item number, and turning it counterclockwise
decreases the item number.
4
Press the MENU control once.
This allows the setting to be changed, and the setting
value flashes.
Turn the MENU control to change the setting.
5
When the desired setting appears, press the MENU
control once more.
This confirms the setting, and the menu item number
and name starts flashing again.
To change settings in a menu item including a submenu, see the
section, “Menu items with submenus”.
6
To make other menu settings, repeat steps 3 to 5.
7
When the setti ngs are complete, press the SET button.
Thi s saves the setti ngs, and the di spl ay returns to
showing a time value.
To cancel setting changes
In step 7 above, before pressing the SET button, press the
MENU button.
This exits the menu mode, without saving the settings.
To change the menu display group by group
To change the menu display group by group, press the
CHROMA button (it is not necessary to hold down the
button) .
In this state, turning the MENU control moves from one
menu group to the next. To return to the MAIN MENU
display, press the CHROMA button once more, or click
the MENU control.
Modes of operating the MENU control
It is possible to select either of two modes in which the
M ENU control operates when selecti ng items or changi ng
settings: either the value changes only when you turn the
control, or the value continues changing even when you
stop turning.
Normally, the state is such that when you use the MENU
control to select items or change settings, the value
changes only when you turn the M ENU control (the value
stops changing when you stop turning).
However, if you press the SETU P/BLACK button, turning
on the PRESET indicator above and to the left of the
MENU control, the menu item or setting continues
changing even when you stop turning.
To stop the change when the PRESET indicator is lit, do
any of the following:
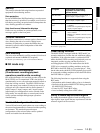
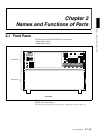
COMPOSITE SDI
VIDEO
INPU T
REMOTE
R1
PORT SELECT
R2/
P3
P1
P2
INPUT
SDI
AES/ EBU
ANALOG
CH1
CH1
PRESET
AUDIO INPUT / MONITOR SELECT
CH2 CH3 CH4
MONITOR
L
R
METER
PANEL
525
REMOTE
MENU
LOCAL
CONTROL
PANEL
625
S
ETUP BANK
TOTAL /
REMAIN
PROCESS
CONTROL
VIDEO
CHROMA
SET UP/BLACK
CHROMA/PHASE
PHONES
123
SYSTEM HDD
HELP
FULL /
TIME
TC/UBTC TYPE
MENU
10
SET
0
CH2
PRESET
CH3
PRESET
CH4
PRESET
VIDEO/MENU
PRESET
7
2 3,4,5
Display panel
0 0 2POS: C H AR H -
60
Item number and name flashes
Setting
002 POS:CHARH-
60
Item number and name
Setting flashes
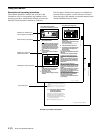
Numbers on switches etc.
refer to steps in procedure
Step number in procedure
Results of a step and
related information
Description of step operation
Cross-reference
Example of procedure description