


Chapter 3 Preparations
3-4 Setup 3-41 (E)
3-4-4 Expansion Menu Operation
You can use the same setting operation in the Expansion
menu as in the Basic menu.
For details of operation in the Basic menu, see Section 3-4-2, “Basic
Menu Operation” (page 3-23).
Note
To access the Expansion menu requires the EM-3 board to
be installed.
For details, refer to the Installation Manual.
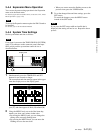
3-4-5 System Time Settings
Set the system date and time as follows.
Note
If any input is present at the TIME CODE IN (SYSTEM)
(page 2-9) connector on the connector panel, that input
takes priority and the system time cannot be set as
described below.
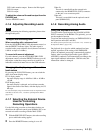
1
Simultaneously press the TIMER SEL and SET
buttons for two seconds or longer.
The current date and time settings appear in the upper
time data display area on the display panel.
Date appears in the order day (D), month (M), and
year (Y), and time appears as hour (H):minute (M).
2
Using the MENU knob, set each of the items day,
month, year, hour, and minute in that order.
• By turning the MENU knob, you can change the
setting of the currently flashing item.
• By pressing the MENU knob, you can move the
flashing cursor to the next item.
• When you want to move the flashing cursor to the
previous item, press the VIDEO button.
3
To set the changed date and time settings, press the
SET button.
To cancel the changes, press the MENU button
instead of the SET button
Note
If you press the SET button while an invalid date is
displayed, that setting will not be set. Repeat the above
process.
COMPOSITE SDI
VIDEO
INPUT
REMOTE
R1
PORT SELECT
R2/
P3
P1
P2
INPUT
SDI
AES/EBU
ANALOG
CH1
CH1
PRESET
AUDIO INPUT / MONITOR SELECT
CH2 CH3 CH4
MONITOR
L
R
METER
PANEL
525
REMOTE
MENU
LOCAL
CONTROL
PANEL
625
SETUP BANK
TOTAL /
REMAIN
PROCESS
CONTROL
VIDEO
CHROMA
SET UP/BLACK
CHROMA/PHASE
PHONES
123
SYSTEM HDD
HELP
FULL /
TIME
TC/UB TC TYPE
MENU
10
SET
0
CH2
PRESET
CH3
PRESET
CH4
PRESET
VIDEO/MENU
PRESET
Display panel
1,3 2
D A T E:
(
D M Y
)
/
TI : :ME
()
HM
17 0 00/812
13 04