


Chapter 5 Basic Functions of Each Mode
5-4 Basic Operations with DTR+Panel and DTR+DTR Modes 5-3 (E)
1
While holding the SHIFT key on the Control Panel,
press B1 (Unload).
2
Turn the MULTI CONTROL knob to select the next
material to play, and press B1 (Load).
Note
Depending on the settings for the Control Panel, Step 1
may not be necessary.
Please refer to the BKMA-505 Control Panel Operating Manual for
details.
5-3-3 EE Signal Selection
In panel mode, when EE signal output has been specified
for each playback port, it is possible to specify the
recording port for which the EE value is to be output.
In order to make this specification, hold down the PORT
SELECT button that corresponds to the target playback
port, and then press the PORT SELECT button for the
recording port for which the EE value is to be output.
• While the PORT SELECT button for a recording port is
pressed, that EE signal is output. When the PORT
SELECT button for that recording port is released, the
output returns to the PB picture.
• Subsequently, if the EE picture output specification is
made for this playback port, the input signal for the
recording port that was specified by the initial operation
is output as the EE picture.
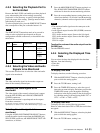
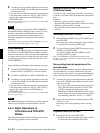
Note
Combinations of ports that can be used with EE operation
are as indicated by the circles in the table below.
(Operation Example)
Outputting the R2 port signal when the EE specification is
made for the P1 port:
1
While holding down the P1 key, press the R2 key.
While the R2 key is held down, the R2 input signal is
output to P1.
2
Press the R2 key.
The display returns to the P1 PB picture.
Subsequently, if the EE specification is made for the
P1 port, the input signal for the R2 port is output as
the P1 EE signal.
Note
In Expansion menu item REFERENCE SELECT (menus
349 to 351), when the recording port standard signal is set
to “input video”, the EE picture is not output.
For details about the setup menu, refer to Section 3-4, “Setup” (page
3-18).
5-4 Basic Operations with DTR+Panel and DTR+DTR
Modes
In DTR+Panel mode, the R1 and P1 ports are controlled
through the DTR-3000, while the other ports are
controlled through the control panel or an external device.
In DTR+DTR mode, R1/P1 and R2/P2 are each controlled
separately through two DTR-3000s.
5-4-1 Initial Setup for DTR+Panel
and DTR+DTR Modes
Before using the DTR+Panel and DTR+DTR modes,
confirm and set up the following:
(1) The DTR-3000 version connected to this unit must
be CP:V01.30, VS:V01.20 or later.
(2) The DTR-3000 must be set to the
DISK:INDIVIDUAL mode.
(3) The DTR-3000 recording time should be set on this
unit.
(4) Whether or not loop recording is used, it should be
set on this unit.
(5) Whether or not partial save is performed should be
set on this unit.
Please contact your supplier or Sony representative if you
require more details about (1) and (2) above.
For more details on (3) and (4) above, please refer to the
following operating information.
Setting the Recording Time from the DTR-
3000
1
Set DTR-1 (and DTR-2) in LIVE DURATION (menu
034) on the basic menu to the desired time.
Playback port
P1 P2 P3
Recording port
R1 O O O
R2 O O
R3 O