


52
Chapter 2: Probing and Selecting the Sampling Mode
Choosing the Sampling Mode
eye finder data must be saved and loaded separately.
1. In the File Info tab, select the Save As... or Load... buttons.
You can also choose the Save Eye Finder or Load Eye Finder command
from the File menu.
2. In the file browser dialog, name the file to be saved or select the file to be
loaded.
For more information on save/load messages, see “Eye Finder Load/Save
Messages” on page 167.
See Also “Understanding State Mode Sampling Positions” on page 256
“Eye Finder Advanced Settings Dialog” on page 170
“To manually adjust sampling positions” on page 52
To manually adjust sampling positions
Although the Eye Finder option was intended for automatically
adjusting state mode sampling positions, you can also use it to
manually adjust sampling positions. You don't have to Run Eye Finder
to locate stable and transitioning regions on signals, just go directly to
the Eye Finder Results tab, and drag the sampling positions to the
proper locations.
1. Select the state (synchronous sampling) mode (see “To select the state
mode” on page 47).
2. In the Format tab, select the Setup/Hold button.
3. In the Sampling Positions dialog, select the Eye Finder option.
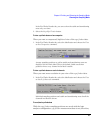
4. In the Eye Finder Results tab, drag the sampling positions to the proper
locations.
You can select bus labels to expand or collapse the channels in the label.
When using the Eye Finder option to manually adjust state mode
sampling positions, the sampling positions are saved with the logic
analyzer configuration (see “Saving and Loading Logic Analyzer
Configurations” on page 116).