


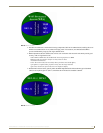

Appendix B - Wireless Technology
168
MVP-8400i 8.4" Modero® ViewPoint® Touch Panel with Intercom
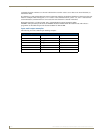
The Certificate Upload Utility recognizes the following certificate file types:
CER (Certificate File)
DER (Distinguished Encoding Rules)
PEM (Privacy Enhanced Mail)
PFX (Normal Windows generated certificate)
PVK (Private Key file)
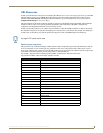
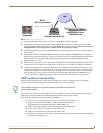
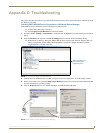
Configuring your G4 Touch Panel for USB Communication
For a personal computer to establish a connection to a Modero panel via USB, the target computer must have the
appropriate AMX USB driver installed. This installation is bundled into the latest TPDesign4 and NetLinx Studio2
software setup process or can be downloaded independently from the main Application Files page on www.amx.com.
Step 1: Setup the Panel and PC for USB Communication
1. If you do not currently have the latest version of TPDesign4, navigate to www.amx.com > Tech Center >
Downloadable Files > Application Files > NetLinx Design Tools section of the website and locate the AMX USB
Driver executable (AMX USBLAN Setup exe).
2. Download this executable file to a known location on your computer.
3. Launch the Setup.exe and follow the on-screen prompts to complete the installation.
Step 2: Confirm the Installation of the USB Driver on the PC
The first time each AMX touch panel is connected to the PC it is detected as a new hardware device and the USBLAN
driver becomes associated with it (panel specific). Each time thereafter the panel is "recognized" as a unique USBLAN
device and the association to the driver is done in the background. When the panel is detected for the first time some user
intervention is required during the association between panel and driver.
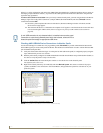
1. After the installation of the USB driver has been completed, confirm the proper installation of the large Type-A
USB connector to the PC's USB port, and restart your machine.
2. Connect the terminal end of the power cable to the 12 VDC power connector on the side/rear of the pane, and
supply power. If using an MVP that is installed onto a docking station, feed power to the docked panel by
connecting the appropriate power supply to the docking station.
3. After the panel powers-up, access the firmware setup pages by either:
- MVP - Pressing and holding the two lower buttons on both sides of the display for 3 seconds.
- CV7/CV10 - Pressing the grey Front Setup Access button for 3 seconds.
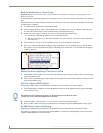
4. Select Protected Setup > System Settings (located on the lower-left) to open the System Settings page.
5. Toggle the blue Type field (from the Master Connection section) until the choice cycles to USB.
The connection remains RED after changing the communication from Ethernet to USB until the panel is
rebooted.
Once the panel restarts, the connection turns a dark green until connected to an active USB cable.
6. Press the Back button on the touch panel to return to the Protected Setup page.
7. Press the on-screen Reboot button to both save any changes and restart the panel. Remember that the panel’s
connection type must be set to USB prior to rebooting the panel and prior to inserting the USB connector.
8. ONLY AFTER the unit displays the first panel page, THEN insert the mini-USB connector
into the Program Port on the panel.
Close the Certificate Upload Utility before configuring the touch panel's USB driver.
Only after the panel has been successfully setup to communicate via USB can you
then re-launch the utility.
If the panel is already powered, continue with steps 3. The panel MUST be powered
and configured for USB communication before connecting the mini-USB connector to
the panel’s Program Port.