


Panel Calibration
11
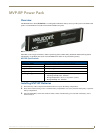
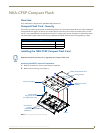
MVP-8400i 8.4" Modero® ViewPoint® Touch Panel with Intercom
Panel Calibration
This section outlines the steps for calibrating the touch panel. It is recommended that you calibrate the panel both before
its initial use and after completing a firmware download.
Modero panels are factory setup with specific demo touch panel pages. The first splash screen that appears indicates the
panel is receiving power, beginning to load firmware, and preparing to display the default touch panel pages. When the
panel is ready, the AMX Splash Screen is replaced by the Initial Panel Page.
Calibrating the MVP Panels
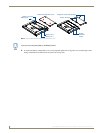
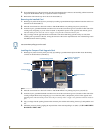
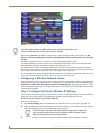
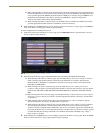
1. Press and hold the two lower external pushbuttons on both sides of the MVP (FIG. 8) for
6 seconds to bypass the Setup page and access the Calibrate page (FIG. 9).
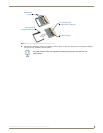
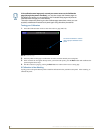
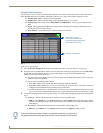
2. Using the included stylus, press the crosshairs (on the Calibrate page) to set the calibration points on the LCD
(FIG. 9).
3. After the "Calibration Successful." message appears, press anywhere on the screen to continue and return to the
Setup page.
If it has not already been removed, peel the protective plastic film from the LCD. If the
protective plastic film on the LCD is not removed, the panel may not respond properly
to touch points on the LCD nor allow proper screen calibration.
FIG. 8 Location of Setup Access buttons
FIG. 9 Calibrate Page
3 second press/hold of both buttons:
Opens the Setup page
6 second press/hold of both buttons:
Opens the Calibrate page
The request to touch the crosshairs
is the first on-screen message
Calibration successful is the second
on-screen message that appears
On-screen crosshairs used for
calibration of the touch device
after the calibration process is
completed