


Configuring Communications
13
MVP-8400i 8.4" Modero® ViewPoint® Touch Panel with Intercom
Configuring Communications
Communication between the MVP and the Master consists of using either Wireless Ethernet (DHCP, Static IP) or USB.
References to Ethernet in this manual focus on the use of Wireless Ethernet via the MVP’s WiFi Card.
Modero Setup and System Settings
AMX Modero panels feature on-board Setup pages. Use the options in the Setup pages to access panel information and
make various configuration changes.
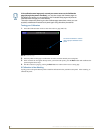
Accessing the Setup and Protected Setup Pages
1. Press down and hold both the bottom, left pushbutton and down on the directional pad simultaneously for 3-5
seconds. This opens the Setup page.
2. Press the Protected Setup button. This invokes a keypad for entry of the password to allow access to the Protected
Setup page. Enter 1988 (the default password), and press Done to proceed.
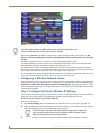
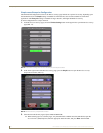
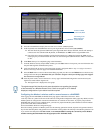
Setting the Panel’s Device Number
In the Protected Setup page:
1. Press the Device Number field to open the Device Number keypad (FIG. 12).
Enter a unique Device Number assignment for the panel, and press Done to return to the Protected Setup page. The
Device Number range is 1 - 32000, the default is 10001.
2. Press Reboot to reboot the panel, and apply the new Device Number.
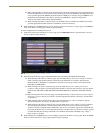
Wireless Settings Page - Wireless Access Overview
Hot Swapping
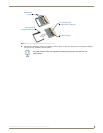
Hot swapping is not an issue on these panels, as the card is installed within the unit and cannot be removed without first
removing the housing.
In the case of DHCP, a DHCP server must be accessible before the fields are populated.
Before commencing, verify you are using the latest NetLinx Master and
Modero panel-specific firmware. Verify you are using the latest versions of AMX’s
NetLinx Studio and TPDesign4 programs.
USB input devices must be plugged into the USB connectors on the docking stations
before the units are powered-up.
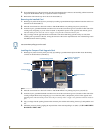
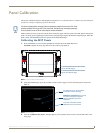
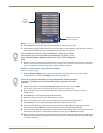
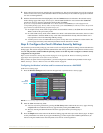
FIG. 11 Setup Page Access buttons
Setup Page Access buttons:
Press and hold simultaneously for
3-5 seconds to access the Setup pages
Press and hold for 6 seconds
to access the Calibration page.