


10-6
User Guide for Cisco Digital Media Manager 5.2.x
OL-15762-03
Chapter 10 DMP Dashboard
Procedures
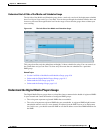
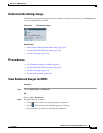
Tip • All gauges are made wide that load on the left side.
• All gauges are made narrow that load on the right side.
Step 3
Stop. You have completed this procedure.
Related Topics
• Understand the Media and Schedules Gauge, page 10-2
• Use the Digital Media Players Gauge, page 10-8
• Use the Cast Gauge, page 10-8
• Use the Settings Gauge, page 10-8
Use the Left Side of the Media and Schedules Gauge
Before You Begin
• You must be logged in an administrator or as a user who has at least read-only permissions for
the schedule.
Procedure
Step 1 Examine the gauge.
Step 2 Do any of the following.
• Click Now to center the timeline on the current hour.
• Move the slider left or right to adjust magnification of the schedule timeline:
–
The far left position “zooms out” to show schedule magnification in 6-hour increments.
–
The far right position “zooms in” to show schedule magnification in 5-minute increments.
• When your browser window is small enough that it shows a horizontal scrollbar above the timeline,
use this scrollbar to scroll the timeline left or right, where left is earlier in the day and right is later
in the day.
Step 3 Stop. You have completed this procedure.
Related Topics
• Understand the Left Side of the Media and Schedules Gauge, page 10-3
• Use the Digital Media Players Gauge, page 10-8
• Use the Cast Gauge, page 10-8
• Use the Settings Gauge, page 10-8