


Configuration
78
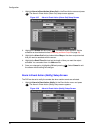
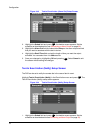
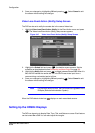
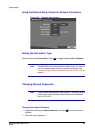
1. Highlight the Sched field and press . A schedule screen appears. Set the
schedule as described earlier see Scheduling an Alarm Output on page 59).
2. Highlight the Camera field and press . A screen appears with which you can
select cameras you would like to record when another camera loses video input.
For example, you can set the DVR to record input from Camera 2 if Camera 1
loses input. Select the number(s) of the camera(s) you would like to associate
with the camera that has lost video.
Note You can associate multiple cameras with a camera.
3. Highlight the Speed field and select from the drop-down menu the number of
images per second you would like to record.
4. Highlight the Quality field and select from the drop-down menu the image quality
you want to record.
5. Highlight the Dwell Time field and set the length of time you would like to record
for the associated video loss.
6. Save your changes by highlighting OK and pressing . Select Cancel to exit
the screen without saving the changes.
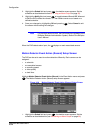
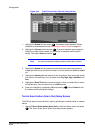
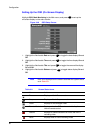
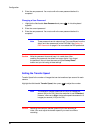
Video Loss Event Action (Alarm Out) Setup Screen
The DVR can be set to react to video loss differently by activating an internal buzzer or
external alarms.
Highlight Video Loss Event Action (Alarm Out) in the Event Action menu and press
. The Video Loss Event Action (Alarm Out) setup screen appears.
Figure 3-46 Video Loss Event Action (Alarm Out) Setup Screen
1. Highlight the Sched field and press . A schedule screen appears. Set the
schedule as described earlier (see Scheduling an Alarm Output on page 59).
2. Highlight the Alarm Out field and select either Beep or the alarm output terminal
that you want to associate with the camera that has lost video.