


110110
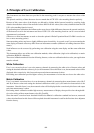
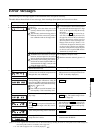
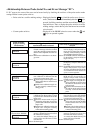
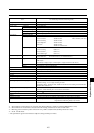
<Relationship Between Probe Serial No. and Error Message “E1”>
If “E1” appears, the cause of the error can be located easily by checking the serial no. of the probe used to make
settings and the current probe serial no.
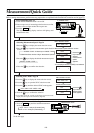
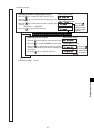
• Probe serial no. used for making settings :
Displayed when the MR key is held down for two to four sec-
onds. (The buzzer sounds once immediately after the MR key is
pressed. It will also sound two and four seconds later if the key is
kept held down. Thus, to display the probe serial no. used for
making settings, release the key after the buzzer has sounded
twice in total.)
• Current probe serial no. : Displayed in the PROBE selection screen when the
and
keys are pressed together.
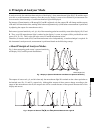
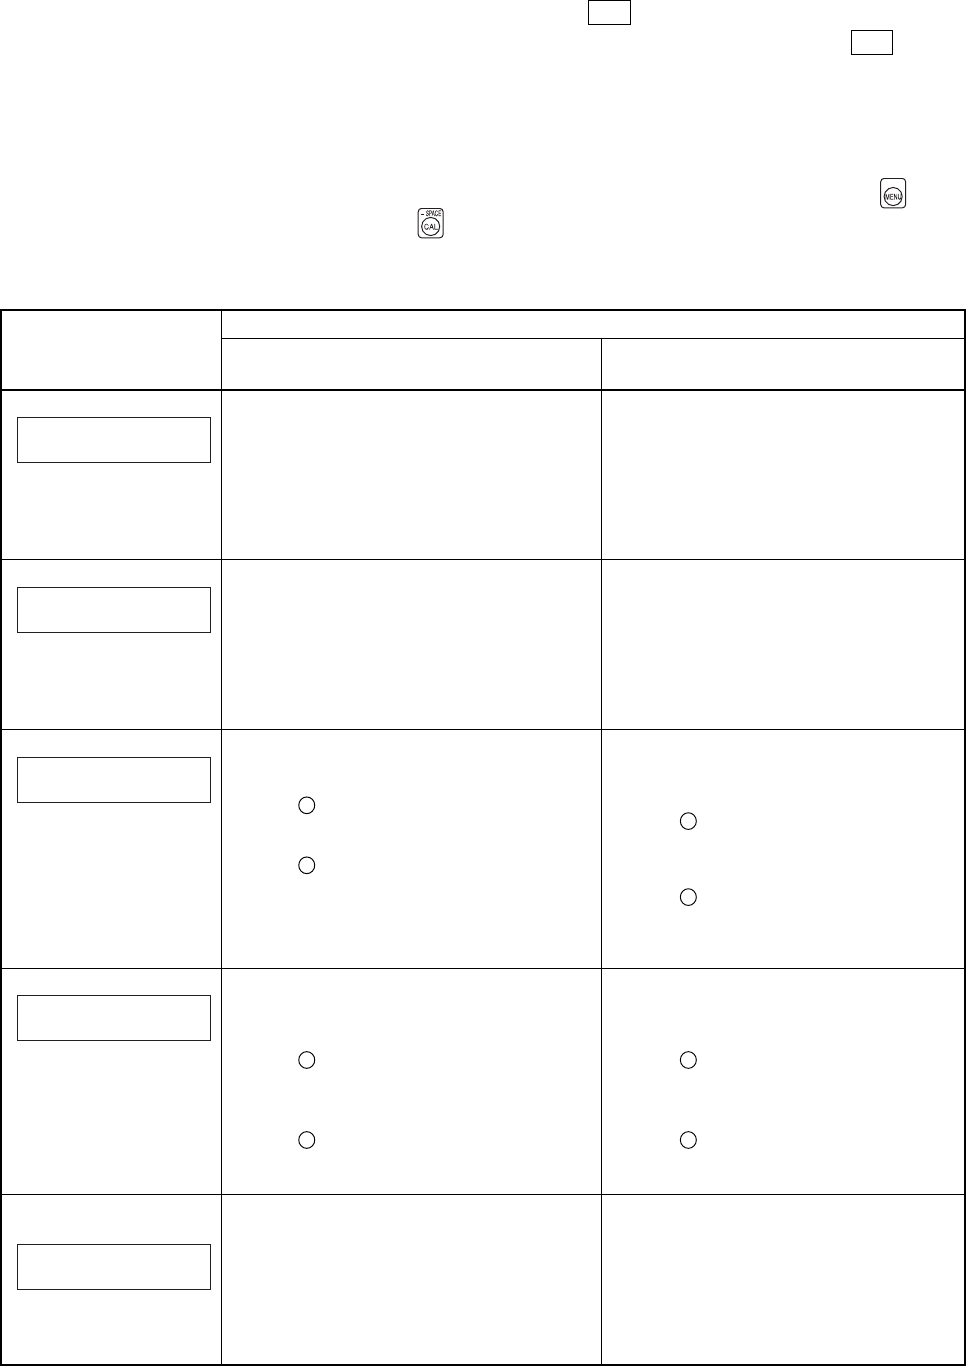
Probe Serial No.
Displayed during
Measurement
When xyLv, T
∆∆
∆∆
∆uvLv, u'v'Lv or XYZ
measurement mode is selected
When analyzer measurement mode is
selected
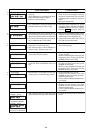
Cause :User calibration has not been per-
formed or the target color has not been
set for the currently selected memory
channel since shipment from the fac-
tory.
Action:Perform user calibration or set the tar-
get color.
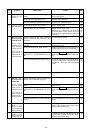
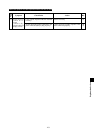
Cause and Action for “E1”
Both lines show “00000000”.
Upper line shows “00000000”.
Same probe nos.
Different probe nos.
Upper line shows “00000000”.
Lower line shows “99999999”.
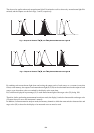
Cause :
Neither the RGB emission character-
istic for display’s analyzer mode nor
target color (W) have been set for the
currently selected memory channel
since shipment from the factory.
Action:
Set the RGB emission characteristic
for the display’s analyzer mode and
target color (W).
Cause :The measuring probe used to perform
user calibration is different from the
one used to set the target color.
Action: 1 Set the target color using the mea-
suring probe that was used for user
calibration.
2 Perform user calibration again us-
ing the currently connected mea-
suring probe.
Cause :
The RGB emission characteristic for
the display’s analyzer mode has not
been input.
Action:
Set the RGB emission characteristic for the
display’s analyzer mode. If you want to
set a target color different from the one that
was set when the emission characteristic
was set, set a new target color.
Cause :
The measuring probe used to input the
RGB emission characteristic for
display’s analyzer mode is different
from the one used to set the target color.
Action: 1
Set the target color using the mea-
suring probe that was used to input
the emission characteristic for the
analyzer mode.
2
Input the emission characteristic for
the analyzer mode again using the
currently connected measuring
probe.
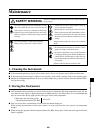
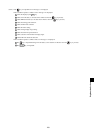
Cause :The currently used measuring probe
is different from the one that was used
to perform user calibration and set the
target color.
Action: 1 Perform measurement using the
measuring probe that was used to
perform user calibration and set the
target color.
2 Perform user calibration and set the
target color .using the currently
connected measuring probe.
Cause :
The currently used measuring probe is dif-
ferent from the one used to input the RGB
emission characteristic for display’s ana-
lyzer mode and set the target color.
Action: 1
Perform measurement using the mea-
suring probe used to input the RGB
emission characteristic and set the
target color.
2
Input the emission characteristic and
set the target color using the currently
connected measuring probe.
Cause :The settings made to the selected
memory channel have been lost from
the instrument’s memory.
As a result, the default (factory) cor-
rection factor and ID name will be
used instead.
Action:Set them again.
Cause :The settings made to the selected
memory channel have been lost
from the instrument’s memory.
As a result, the default (factory) ID
name will be used instead.
Action:Set them again.
00000000
00000000
21593001
16790160
16790160
16790160
00000000
99999999
00000000
16790160