


Backing Up and Restoring System Management and Maintenance
Polycom, Inc. 385
3 In the Actions list, click Create New (Full) to create a full backup or
Create New (Config Only) to create a configuration-only backup (no
transaction data).
A confirmation dialog tells you the backup archive was created. For a full
backup, this may take some time.
4 Click OK.
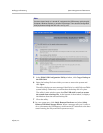
To upload a backup file
1 Go to Maintenance > Backup and Restore.
2 Verify that the oldest backup file listed is one you don’t want to keep or
have already downloaded.
Only ten files are saved. Uploading a backup will delete the oldest file
(unless there are fewer than ten).
3 In the Actions list, click Upload.
4 Choose a backup file to upload and click Open.
The File Upload dialog box indicates when the upload is complete.
5 Click Close.
The system asks if you want to restore now from the backup file you just
uploaded.
6 If you don’t want to restore (and restart the system) now, click Manually
Later. When you’re ready to restore, use the procedure that follows this
one.
7 To restore now, make sure you meet the criteria in the first two steps of
the next procedure, and click Now. When asked to confirm, click Yes.
A dialog box informs you when all files have been restored.
8 Click OK.
The system logs you out and the server reboots (typically, this takes about
five minutes). After it comes back up, in a two-server cluster, the second
server syncs to it, thus being restored to the same state. Depending on the
configuration changes being applied, it may reboot so the changes can
take effect.
When done, both servers’ LCDs display DMA Clustered.
9 Log back in as a local admin user and:
a In a two-server cluster, verify on the Dashboard that both servers are
up and the private network connection is operating properly.
b Go to Maintenance > Software Upgrade and check the Operation
History table.