


C626M-C (5/06) 145
Configuring Advanced ATM/POS-Activated Relay Output
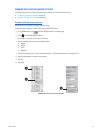
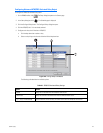
To configure an ATM/POS-activated relay output:
1. On the DX8000 toolbar, click . The Setup dialog box opens to the Camera page.
2. In the Setup dialog box, click . The Schedule page is displayed.
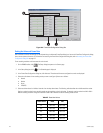
3. Click the Configure Relays button. The Configure Relays dialog box opens.
4. Click the ATM/POS tab if it is not already selected.
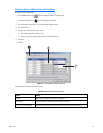
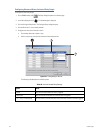
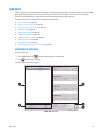
5. Configure each relay that is linked to an ATM/POS:
a. Click the drop-down box to select a relay.
b. Select a relay timing value from the Activation Period drop-down box.
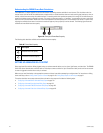
Figure 119. Linking Relays to ATM/POS
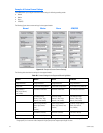
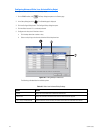
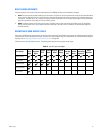
The following table describes the available options.
Table AI. ATM/POS-Activated Relay Settings
Option Result
Disable Relay will not activate when the ATM/POS event occurs.
Follow Event Relay will activate at the exact same time the ATM/POS event occurs.
1, 3, 5, 10,15, and 20 Seconds Sets the amount of time the relay will remain active after the ATM/POS event occurs.
ᕤ
5a
5a
5
b