


32
D95:525/625
00A:MENU SETTING
SET+HOLD INITIAL
00B:DIRECT ACCESS
SET+HOLD>ON
00C:USER PAGE
SET+HOLD>INITIAL
00D:MENU LOCK
SET+HOLD>OFF
M
H
F
S
SET+HOLD[POWER OFF>525
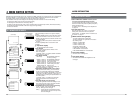
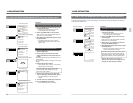
4-4 SAVING AND CALLING UP MENU SWITCH SETTINGS
4 MENU SWITCH SETTING
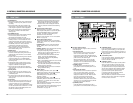
The set menu switch data can be saved and called up with the 00A MENU SETTING item on the top menu
display.
If you’re going to use the current menu switch setting again later, you can store it in the user memory area. Then,
if the setting is changed, you can restore it simply by calling the stored user data.
It is also possible to restore the initial factory settings.The menu switch setting can be saved in USER-1 SAVE,
USER-2 SAVE or USER-3 SAVE .
Top menu display
Set value
Item No.
[Counter display]
[On-screen display]
300: DIRECT EJECT
ON
301:DIRECT SEARCH
ON
302:BACK SPACE
ON
307:PAUSE/STILL/STP TIME
311:AUTO PLAY
OFF
Menu switch setting display
300: DIRECT EJECT
OFF
301:DIRECT SEARCH
ON
302:BACK SPACE
ON
307:PAUSE/STILL/STP TIME
311:AUTO PLAY
OFF
300: DIRECT EJECT
ON
301:DIRECT SEARCH
ON
302:BACK SPACE
ON
307:PAUSE/STILL/STP TIME
311:AUTO PLAY
OFF
LOAD
Memory
SAVE
Change
Call up
5MIN
5MIN
5MIN
POWER
ON
I
OFF
O
M
H
F
S
REC
MENU
PLAY
PAUSE/ STILL
REW
STOP
FF
EJECT
PHONES
CH1
CH2
CH3
CH4
REC
PLAY
PULL FOR VARIABLE
TRACKING
CH1
CH1
CH2
CH3
CH4/
TRACKING
SET
HOLD
PB
PB/EE
COUNTER
UB
CONDITION
AUDIO
INPUT
VIDEO
INPUT
AUDIO
MONITOR
PULL
RELEASE
RESET
VCON
REMOTE
TOP VIDEO AUDIO
OTHERSON SCREENTIME CODESERVO/SYS
USER
INSERT
STAND BY
PLAYER
SEARCH
VAR
P.PLAY
DA3
DA2
DA1VIDEO
ASSEM
IN
ENTRY
OUT
CANCEL
SHIFT
REVIEW
METER MODE
TRACKING
FINE
PREVIEW
AUTO EDIT
PREROLL
TC
RECORDER
DA4
VIDEO CASSETTE RECORDER
BR-D95U
STILL
X-1
REV
FWD
X1
CH2
CH3
CH4
CH1
CH2
CH3
CH4
CH1
CH2
CH3
CH4
SIF
SDI
AES/EBU
AUDIO INPUT / AUDIO MONITOR SELECT
LINE
CPN
L
ANALOG
R
PULL
RELEASE
CTL
P.READ
AUTO
OFF
V.VAR
REMOTE
PB/EE
16:9
TC
UB
DF
SERVO
GENCF
AP
525
OVER
–60
–2
–4
+2
+4
0
–40
–30
–20
–10
0
dB
dB
R
P
OVER
–60
–2
–4
+2
+4
0
–40
–30
–20
–10
0
dB
dB
R
P
OVER
–60
–2
–4
+2
+4
0
–40
–30
–20
–10
0
dB
dB
R
P
OVER
–60
–2
–4
+2
+4
0
–40
–30
–20
–10
0
dB
dB
R
P
625
Variable Motion
COMPONENT DIGITAL
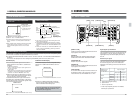
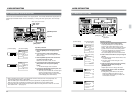
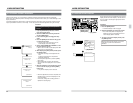
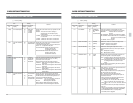
[MENU] button
[HOLD] button
[SET] button
Jog dial
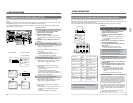
Operation procedure
1. Press the [MENU] button and turn the jog dial
to call up the top menu on the on-screen
display and the counter display.
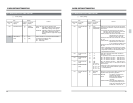
2. Select 00A: MENU SETTING.
● Turn the jog dial so that 00A appears on the
counter display and 00A blinks on the on-screen
display.
3. Select the saving or calling-up function and
execute it.
When restoring the initial factory settings
● Select “INITIAL (0)” by turning the jog dial while
pressing the [SEARCH] button.
+
● Press the [HOLD] button while pressing the
[SET] button.
[ Factory settings are restored.
[ The Normal Display mode is restored.
* The fixed time data is not changed.
To call up the saved menu setting
(Recalling data stored in USER-1 SAVE )
● Select “USER-1 LOAD” by turning the jog dial
while pressing the [SEARCH] button.
+
● Press the [HOLD] button while pressing the
[SET] button.
[ The saved menu switch setting in “USER-1
SAVE” comes up.
[ The Normal Display mode is restored.
The data stored in USER-2 SAVE or USER-3
SAVE can be recalled using USER LOAD-2 or
USER-3 LOAD , respectively.
To save the current menu switch setting
(Storing data in USER-1 SAVE )
● Select “USER-1 SAVE” by turning the jog dial
while pressing the [SEARCH] button.
+
● Press the [HOLD] button while pressing the
[SET] button.
[ The current menu setting is stored in the user
memory area. The data already saved is
updated.
[ The Normal Display mode is restored.
33
D95:525/624
00A:MENU SETTING
SET+HOLD INITIAL
00B:DIRECT ACCESS
SET+HOLD>ON
00C:USER PAGE
SET+HOLD>INITIAL
00D:MENU LOCK
SET+HOLD>OFF
REC
PLAY
PAUSE / STILL
REW
STOP
FF
EJECT
TOP VIDEO AUDIO
OTHERSON SCREENTIME CODESERVO/SYS
STAND BY
PREROLL
M
H
F
S
SET+HOLD[POWER OFF>525
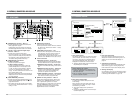
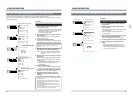
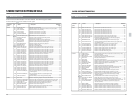
Access item Control Information on display
button
TOP menu SW EJECT TOP menu
VIDEO menu SW PLAY Menu SW numbered
100 and 600
AUDIO menu SW PAUSE/ Menu SW numbered
STILL 200
SERVO/SYSTEM STANDBY Menu SW numbered
menu SW 000 and 300
TC menu SW REW Menu SW numbered
400
ON-SCREEN menu STOP Menu SW numbered
SW 500
Hour meter FF Drum running hours
User menu SW PREROLL Menu switch on the
user page
4-5 CALLING UP FUNCTIONAL MENU SWITCH (Direct Access Function)
4 MENU SWITCH SETTING
The Direct Access facility groups menu switches into major functionally related groups such as SERVO and
VIDEO for easier access. These groups can be called up directly on the menu display. Hour meter data and User
Page menu switches can also be accessed this way.
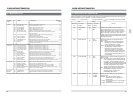
The Direct Access function can be turned on or off with 00B DIRECT ACCESS on the top menu display.
Enabling the Direct Access function
Procedure
Setting
00B
Counter display
Page down function
When menu switches for a function are shown on
more than one screen, you can display the menu
screen by group with the Direct Access function.
Then, each time the operation button correspond-
ing to the same Direct Access function is pressed,
the menu screens in the group can be advanced
one screen at a time (page down function).
(e.g.) When the [PLAY] button is pressed with the
Direct Access function set to “ON”, the top screen
of menu switch #100 is shown. When the [PLAY]
button is pressed again, the next menu screen is
shown.
• If the group consists of one screen, the page
down function cannot be used.
1. Press the [MENU] button and turn the jog dial
to call up the top menu on the on-screen
display and the counter display.
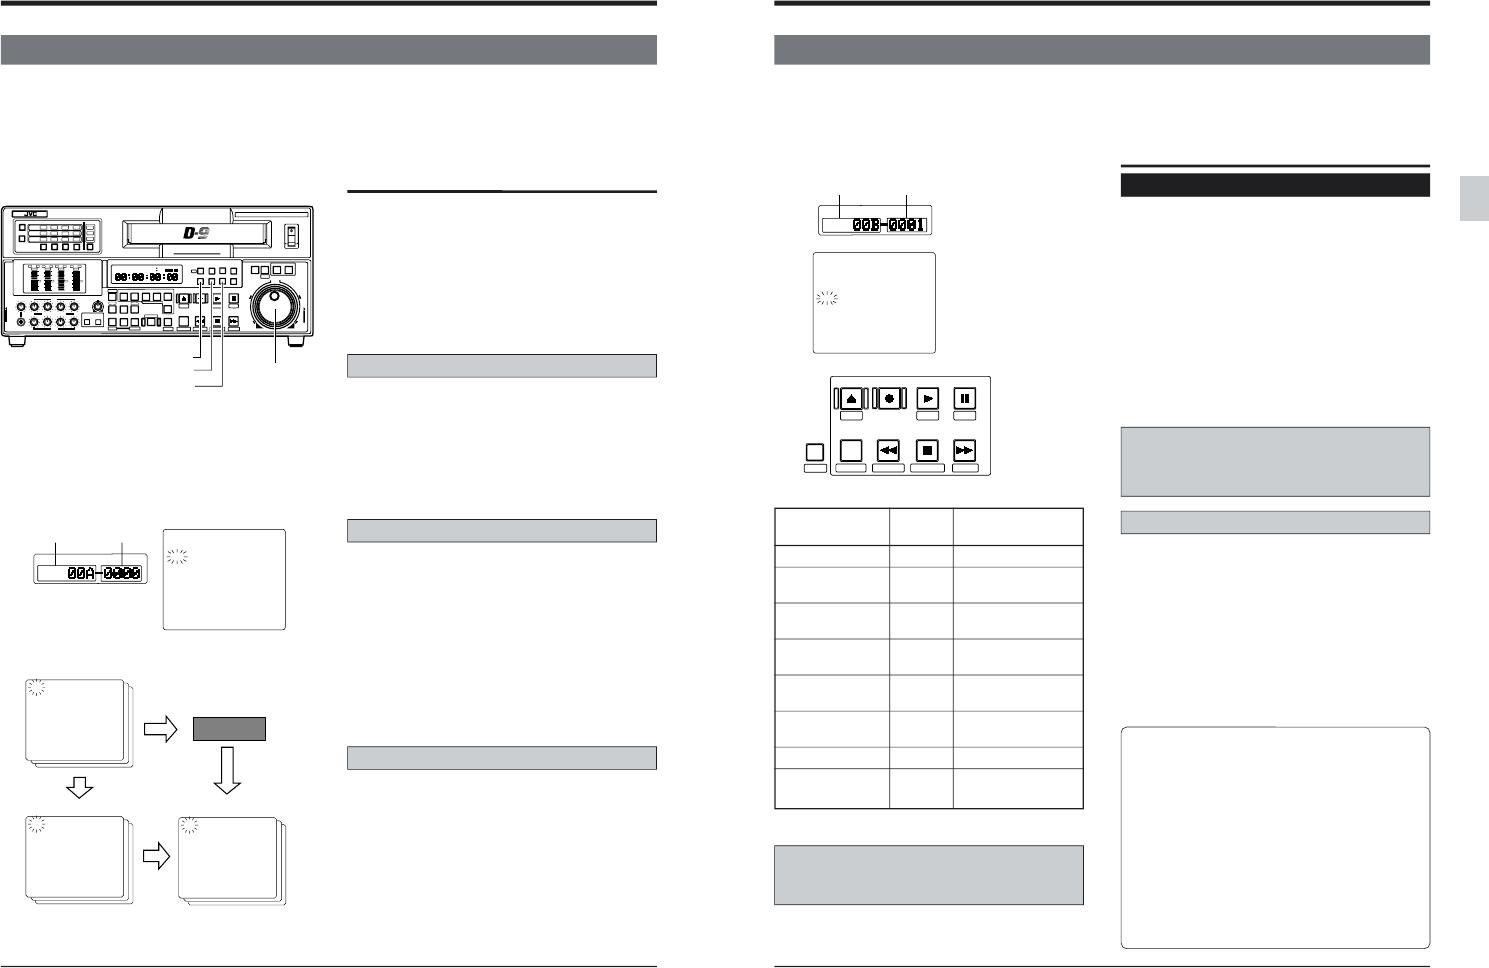
2. Turn the jog dial and select “00B DIRECT
ACCESS”.
● Turn the jog dial so that “00B” appears on the
counter display and “00B” blinks on the on-
screen display.
3. Select “ON (1)” by turning the jog dial while
pressing the [SEARCH] button.
4. Press the [HOLD] button while pressing the
[SET] button.
The Direct Access function is set to ON.
[ The Normal Display mode is restored.
To disable Direct Access, select “OFF (0)” by
turning the jog dial while pressing the
[SEARCH] button, then press the [HOLD]
button while pressing the [SET] button.
Using the Direct Access function.
● Make sure the Direct Access function is set to
“ON”.
1. Press the [MENU] button to call up the menu
setting display.
2. Press the corresponding front panel control
button, depending on the item. (Refer to the
table on the left.)
[ The starting item is shown on the counter
display and the first data appears on the on-
screen display, depending on what has been
selected.
Move the items by turning the jog dial.
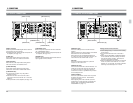
Front panel operation buttons
On-screen display
The labels under the front panel control buttons
indicate the functions that can be called up with
the Direct Access facility.