


66
Two different sub modes are available in the Stop mode.
Standby ON mode: The tape is loaded and the head drums are rotating, permitting
quick start of operation when another mode is engaged.
The [STANDBY] button is illuminated.
Standby OFF mode: The tape is loaded but the drums are stationary. The tape
and the heads are protected against damage in this mode.
The [STANDBY] button’s light goes out.
The Output mode in the Standby ON and OFF modes can be selected with the [PB/
EE] button (see notes for details).
Procedure
Ⅲ Standby ON mode is engaged when the cassette is loaded or when the Stop
mode is engaged with the STOP button.
Ⅲ To change the Standby ON mode to the Standby OFF mode, press the
[STANDBY] button.
[The [STANDBY] button goes out, indicating that the Standby OFF mode has
been engaged.
Ⅲ To change the Standby OFF mode to Standby ON mode, press the [STANDBY]
button.
[The [STANDBY] button is illuminated, indicating that the Standby ON mode
has been engaged.
* The Standby ON mode is automatically switched to the Standby OFF mode
after about 5 minutes to protect the tape and the heads. The time when the
Standby OFF mode is engaged can be selected with menu switch No. 307
<PAUSE/STILL/STP TIME>.
6 PREPARATION
6-2 STANDBY ON/OFF
Notes
●Output mode selection in
the Standby ON/OFF mode
Pressing the [PB PB/EE]
button switches between
Still output or the EE mode.
The counter display
changes to “PB” or “PB/
EE”.
In the EE mode, the input
signal can be monitored.
● When video and audio
signals are output from the
built-in signal generator;
To output video signals
from the signal generator,
press the [VIDEO INPUT]
button so that all [VIDEO
INPUT] indicators light.
Select the video signal type
from the signal generator
with menu switch No. 111
<VD REC SIGNAL SEL.>.
To output audio signals
(1 kHz, sine wave) from the
signal generator, set menu
switches No. 253 to No.
256 <CH1 to 4 REC
SIGNAL SEL.> to “1 kHz
SINE” and press the audio
signal select buttons to
select the required
channels. The
corresponding [AUDIO
INPUT] indicators will light.
●In the PB mode, pressing
the [REC] button allows
you to monitor the input
signal. Pressing the
[STOP] button restores the
Play mode.
POWER
ON
I
OFF
O
M
H
F
S
REC
MENU
PLAY
PAUSE/ STILL
REW
STOP
FF
EJECT
PHONES
CH1
CH2
CH3
CH4
REC
PLAY
PULL FOR VARIABLE
TRACKING
CH1
CH1
CH2
CH3
CH4/
TRACKING
SET
HOLD
PB
PB/EE
COUNTER
UB
CONDITION
AUDIO
INPUT
VIDEO
INPUT
AUDIO
MONITOR
PULL
RELEASE
RESET
VCON
REMOTE
TOP VIDEO AUDIO
OTHERSON SCREENTIME CODESERVO/SYS
USER
INSERT
STAND BY
PLAYER
SEARCH
VAR
P.PLAY
DA3
DA2
DA1VIDEO
ASSEM
IN
ENTRY
OUT
CANCEL
SHIFT
REVIEW
METER MODE
TRACKING
FINE
PREVIEW
AUTO EDIT
PREROLL
TC
RECORDER
DA4
VIDEO CASSETTE RECORDER
BR-D95U
STILL
X-1
REV
FWD
X1
CH2
CH3
CH4
CH1
CH2
CH3
CH4
CH1
CH2
CH3
CH4
SIF
SDI
AES/EBU
AUDIO INPUT / AUDIO MONITOR SELECT
LINE
CPN
L
ANALOG
R
PULL
RELEASE
CTL
P.READ
AUTO
OFF
V.VAR
REMOTE
PB/EE
16:9
TC
UB
DF
SERVO
GENCF
AP
525
OVER
–60
–2
–4
+2
+4
0
–40
–30
–20
–10
0
dB
dB
R
P
OVER
–60
–2
–4
+2
+4
0
–40
–30
–20
–10
0
dB
dB
R
P
OVER
–60
–2
–4
+2
+4
0
–40
–30
–20
–10
0
dB
dB
R
P
OVER
–60
–2
–4
+2
+4
0
–40
–30
–20
–10
0
dB
dB
R P
625
Variable Motion
COMPONENT DIGITAL
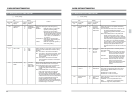
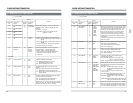
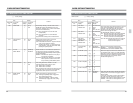
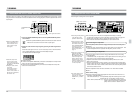
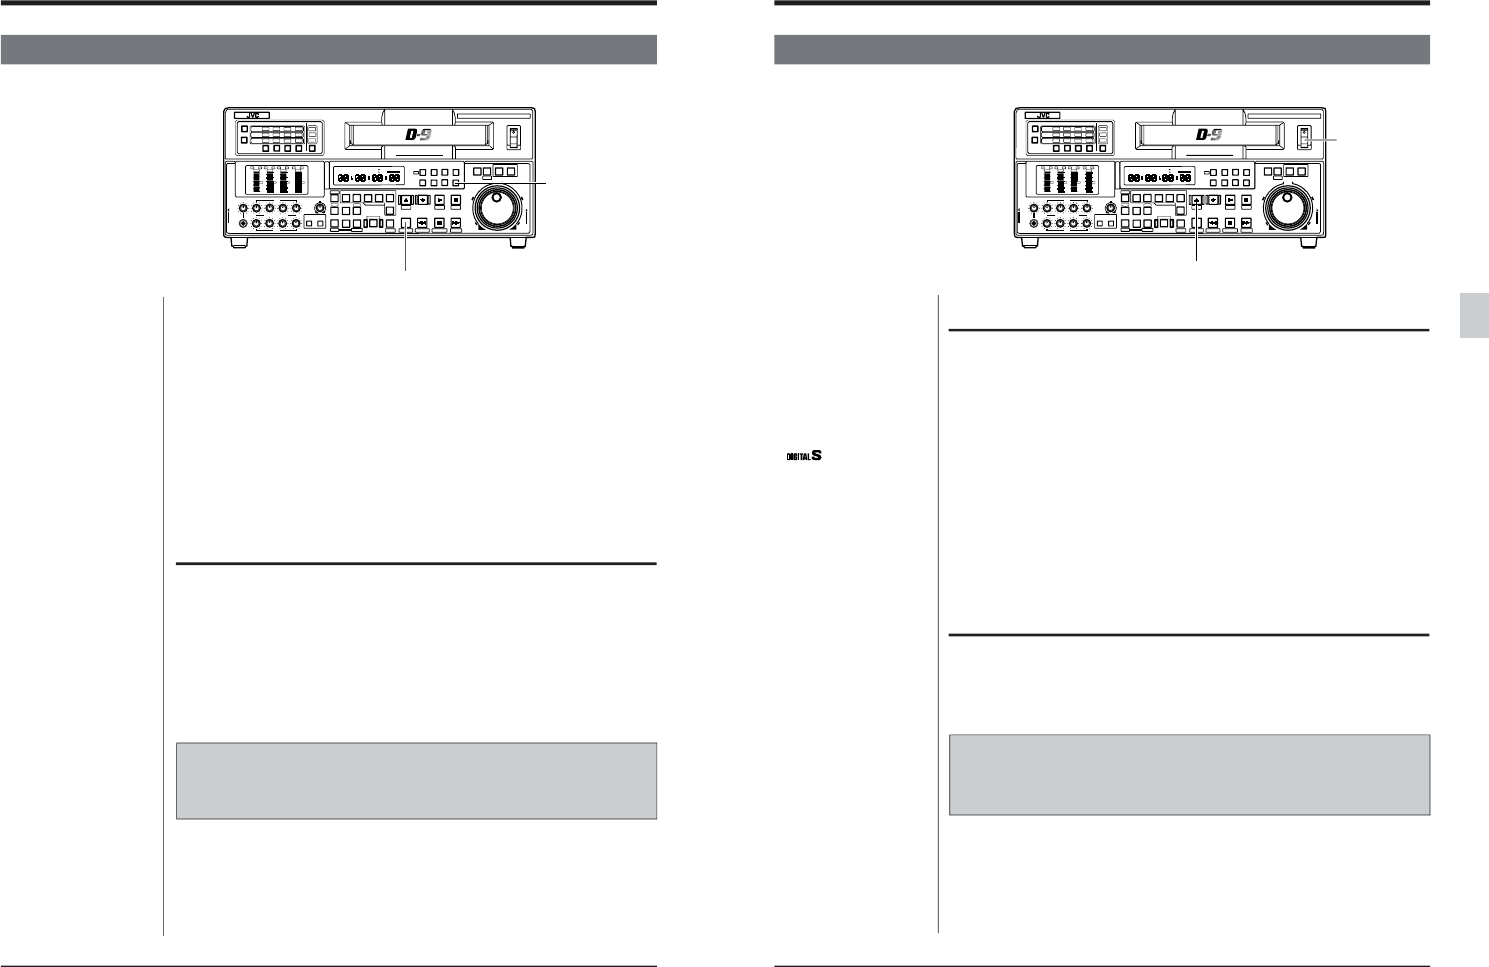
[STANDBY] button
[PB PB/EE] button
67
6 PREPARATION
6-3 LOADING AND UNLOADING THE CASSETTE
Loading the cassette
1. Turn the [POWER] switch on.
[The counter display is illuminated.
*If a cassette is not loaded, the counter display indicates “No Tape” and the
on-screen display indicates “NO TAPE”. These are not shown when setting the
menu switches.
2. Load the cassette.
If tape tension is slack, tighten it before inserting the cassette. Insert the
cassette with the cassette label facing you. Press the center of the cassette
gently until the loading mechanism takes over.
[The cassette is automatically drawn into the slot and the [STOP] button
lights.
When the cassette is fully loaded, the Standby ON mode is engaged and the
[STANDBY] button lights.
*When a cassette tape with the REC switch set to OFF is loaded, “REC Inh” is
shown on the tape counter display for about 2 seconds.
Unloading the cassette
1. Press the [EJECT] button.
[The cassette is ejected.
The CTL counter is reset.
2. Remove the cassette from the slot.
Precautions
●Do not insert anything other than a cassette into the slot.
●Do not try to remove the cassette once automatic cassette loading has begun.
Wait until loading is complete, then press the [EJECT] button.
Notes
● To call up the on-screen
display, set the [ON
SCREEN] switch on the
sub panel to “ON”. On-
screen data are output
through the rear panel
[LINE2-SUPER] connector.
● Be sure to use only
cassette tapes.
VHS/S-VHS cassettes
cannot be used.
● Conditional EJECT
operation
When menu switch No.
301 <DIRECT EJECT> is
set to “OFF (0)”, the
[EJECT] button is enabled
only in the Standby ON or
OFF mode.
With this switch set to “ON
(1)”, tapes can be ejected
in any mode.
POWER
ON
I
OFF
O
M
H
F
S
REC
MENU
PLAY
PAUSE/ STILL
REW
STOP
FF
EJECT
PHONES
CH1
CH2
CH3
CH4
REC
PLAY
PULL FOR VARIABLE
TRACKING
CH1
CH1
CH2
CH3
CH4/
TRACKING
SET
HOLD
PB
PB/EE
COUNTER
UB
CONDITION
AUDIO
INPUT
VIDEO
INPUT
AUDIO
MONITOR
PULL
RELEASE
RESET
VCON
REMOTE
TOP VIDEO AUDIO
OTHERSON SCREENTIME CODESERVO/SYS
USER
INSERT
STAND BY
PLAYER
SEARCH
VAR
P.PLAY
DA3
DA2
DA1VIDEO
ASSEM
IN
ENTRY
OUT
CANCEL
SHIFT
REVIEW
METER MODE
TRACKING
FINE
PREVIEW
AUTO EDIT
PREROLL
TC
RECORDER
DA4
VIDEO CASSETTE RECORDER
BR-D95U
STILL
X-1
REV
FWD
X1
CH2
CH3
CH4
CH1
CH2
CH3
CH4
CH1
CH2
CH3
CH4
SIF
SDI
AES/EBU
AUDIO INPUT / AUDIO MONITOR SELECT
LINE
CPN
L
ANALOG
R
PULL
RELEASE
CTL
P.READ
AUTO
OFF
V.VAR
REMOTE
PB/EE
16:9
TC
UB
DF
SERVO
GENCF
AP
525
OVER
–60
–2
–4
+2
+4
0
–40
–30
–20
–10
0
dB
dB
R
P
OVER
–60
–2
–4
+2
+4
0
–40
–30
–20
–10
0
dB
dB
R P
OVER
–60
–2
–4
+2
+4
0
–40
–30
–20
–10
0
dB
dB
R P
OVER
–60
–2
–4
+2
+4
0
–40
–30
–20
–10
0
dB
dB
R
P
625
Variable Motion
COMPONENT DIGITAL
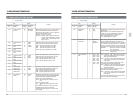
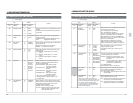
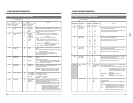
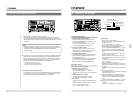
[EJECT] button
[POWER]
switch