


D-160 Owner's Manual (Saving and loading data)
110
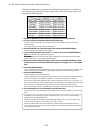
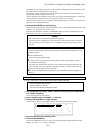
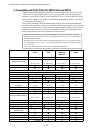
Although the following chart presents the SCSI disk formatting time in accordance to
each format type (measured by Fostex), please refer to this, as necessary, only for an
approximate formatting time.
Formatting Time
TYPE 0, 2 TYPE 3
SyJet (1.5GB) Approx. 20 minutes Approx. 5 seconds
FireBall (1GB) Approx. 16 minutes Approx. 5 seconds
PD (640MB) Approx. 50 minutes Approx. 22 seconds
MO (230MB) Approx. 12~15 minutes Approx. 27 seconds
MO (540MB) Approx. 14~17 minutes Approx. 22 seconds
EZ135 (135MB) Approx. 3 minutes Approx. 4 seconds
ezflyer (230MB) Approx. 6 minutes Approx. 5 seconds
zip (100MB) Approx. 4 minutes Approx. 8 seconds
jaz (1GB) Approx. 15 minutes Approx. 5 seconds
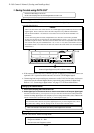
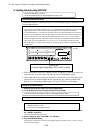
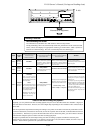
1. Connect the SCSI device to the D-160 and turn the power on to the both machines.
2. If you are using a removable disk, insert the disk into the drive.
To remove the inserted disk, press the STOP button and the EXIT/NO key on the D-160
simultaneously.
You cannot remove the disk from the SCSI device.
3. Press the DISP SEL key to select the Setup mode, and press the EXECUTE/YES key.
The Setup mode menu appear on the display.
4. Turn the JOG dial to select “Disk Format?” (“?” flashes), and press the EXECUTE/YES key
again.
“
Disk Format IDE” (“IDE” flashes) appears.
CAUTION: CAUTION:
CAUTION: CAUTION:
CAUTION: If format is executed while "IDE" is blinking, the internal IDE hard disk will be
formatted and data in the IDE hard disk will be lost.
5. Rotate the JOG dial to display the flashing “SCSI” and press the EXECUTE/YES key. The ID
number and name of the connected SCSI device appear on the display, and “?” and “SURE?”
flash.
6. Press the EXECUTE/YES key.
The D-160 indicates “Please Wait!” followed by the results of a performance measurement of the
connected SCSI device, and flashes an appropriate format type and the message “SURE?”.
7. Press the EXECUTE/YES key.
“REMAIN” lights up and formatting starts.
As the formatting operation progresses, the size of the area to be formatted on the disk will count
down on the display. (For example, indication “-125MB” will count down to “0MB”.)
Also, when the formatting operation starts, all the FL indicators (for Tracks 1-16) at level ∞ of
the level meters light up. As the formatting operation progresses, these indicators will be turned
off from Track 16. This condition indicates that the disk is being formatted correctly.
When formatting is complete, “COMPLETED!” will appears and all the FL indicators will turn off.
8. Press the EXIT/NO key or the STOP button to quit the Setup mode.
The D-160 returns to the ABS display of the Program that was selected before it entered Setup
mode.
In addition to the formatting procedure mentioned above, you can also use the following
steps to format an unformatted disk.
Install an unformatted fixed disk or removable disk, and go to the “2-21. Drive Sel.?” menu
in Setup mode. Change the current drive from “IDE” to “SCSI”.
The D-160 will recognize that the SCSI disk is not formatted and automatically enter the
“2-24. Disk Format ?” menu in Setup mode, where you can follow the procedure mentioned
above to format the disk.