


D-160 Owner's Manual (MIDI sync function)
130
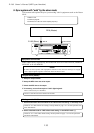
POWER
SHIFT
AUTO
CLIPBOARD PLAY
LOCATE ABS 0
DIGITAL MULTITRACK RECORDER
D-160
IN / OUT
PUNCH
PGM CHANGE
8/167/156/145/134/123/112/101/9
RECORD TRACK
HD ACCESSLOCKED MTC IN
ENDIN OUTSTART
AUTO PUNCH
AUTO PLAY IN OUT
AUTO RTN
CLIPBOARD
PASTEMOVECOPY
AUTO RTN
ERASE UNDO REDO
DISP SEL
EXECUTE
/YES
EXIT
/NO
HOLD/ STORE RECALL
TIME BASE SEL
TAKE
REHEARSAL
LOCATEPUNCH
F FWDREWINDPLAYSTOPRECORD
VARI PITCH
LOCATE ABS END
DIGITAL OUT
DATA INPUT
MIDI OUT
MIDI IN
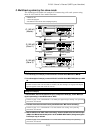
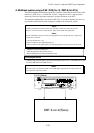
RD-8 (Master)
5. Sync system with "adat" by the slave mode
This section will explain the sync system using "adat" equipment such as the Fostex
RD-8.
* Initialize D-160.
* Confirm the program.
* Set RD-8 and D-160 to the same sampling frequency.
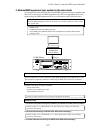
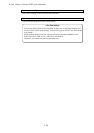
Equipment connections
Make connections, respectively, RD-8 DIGITAL OUT to D-160 DATA IN, and RD-8
MIDI OUT to D-160 MIDI IN.
<Note>
In order to slave operate adat equipment and the D-160, the best setting is to supply
"adat" digital signals together with MTC from the master unit.
D-160 (Slave)
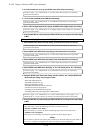
Setup of RD-8 (master)
1
. Setup for output of MTC.
2
. Setup the MTC frame rate to be output.
3
. Check the MTC time to be output.
4
. If necessary, set to allow output of "adat" digital signals.
This is unnecessary for the RD-8.
# Refer to the RD-8 Owners Manual for details.
Settings on the D-160
1. Set the same frame rate as the RD-8 for the “MTC Frame rate setting” in the Setup mode.
# Refer to “2-9. MTC Frame rate setting” in Setup mode on page "151" for the operation and
more information.
2. Select a desired mode for “MTC offset mode setting” in the SETUP mode. (*)
# Refer to “2-11. MTC offset mode setting” in Setup mode on page "153" for the operation
and more information.