


D-160 Owner's Manual (Recording/Playback)
61
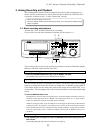
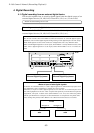
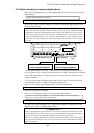
* If the external device has only a coaxial (RCA) type digital output connector, use the
optional COP-1 optical/coaxial converter to connect the device to transmit an S/P DIF
digital signal. The operation is the same as that for a device with a coaxial connector.
* If you connect both the digital input and output of the D-160 to those of an external
digital device, a digital loop may be generated. Refer to “4-3. Connecting a digital mixer”
for more information.
Setting an external device
Set the external device so that it will output digital signals from the digital output
connector. Some devices may output digital signals only when they are in playback
mode.
* Refer to the instruction manual that came with the external device for details.
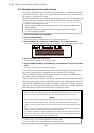
Selecting a recording Program
Selecting the recording Program.
Refer to "2-2. Program Change" section for more information.
* Refer to “2-1. Setting a Program” ," 2-2. Program Change" and "2-3. Deleting a
Program" for more information on Programs.
Setting the sampling rate for a recording Program
*****IMPORTANT*****
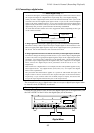
When an S/P DIF digital signal is input to the D-160, be sure to match the sampling rate
of the D-160 to that of the external digital device.
* If the sampling rate settings do not match, you cannot record the S/P DIF digital
signal.
* For an adat digital signal, the D-160 will be able to record data with a different sampling
rate setting. However, the data will be recorded at a different speed. The D-160 will
lock to the external word clock when S/P DIF or adat digital signals are input to the
digital input tracks. (The D-160 will operate, referencing to the word clock sent from
the external device.) However, an adat digital signal does not contain the sampling rate
information (48kHz or 44.1kHz) that is included in the S/P DIF digital signal. This is
why the D-160 can sync to the external device with a different sampling rate.
* Initial setting: 44.1kHz
* Sampling rate settings: 44.1kHz, 48kHz
* This parameter can be set for each Program.
* The setting can be saved and loaded as part of the song data.
* This setting will be retained after you turn off the power.
* Refer to “2-4. Setting a sampling rate” on page "52" for information on how to set
the sampling rate of the selected Program.
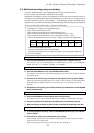
After setting the sampling rate, press the DISP SEL key to display the REMAIN
indication and check the remaining time available for recording.
If there is not enough time for recording, try to increase the time by using the
Erase function to move the ABS END point of another Program forward, or by saving
the song data of Programs that are not often used to a DAT machine to clear that
data from the unit.
<Note>
A 48kHz sampling rate setting requires more disk space than the 44.1kHz setting.
This means that the available recording time would be shorter.
* Refer to page "96" for more information on the Erase function.
* Refer to page "102" for more information on saving song data.