


D-160 Owner's Manual (Names and Functions)
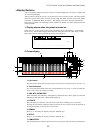
20
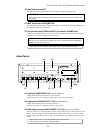
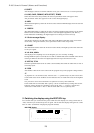
29. Paste key [PASTE]
Press this key to copy data or move data that has been copied to the clipboard to a
location stored at the AUTO PUNCH IN key. The data will be pasted at the point stored in
the Auto Punch In key. You can select the paste destination track using the RECORD
TRACK select key. A destination track to which data is pasted is identical to the source
track. This key is activated only when the recorder transport section is stopped.
* Refer to page "85" for more information about the Copy & Paste, and Move & Paste operation.
30. Move key [MOVE]
This key is used to enter into the clipboard data stored in memory by the CLIPBOARD IN/
OUT keys. Pressing the MOVE key will store the data in the Clipboard as Move data.
To enter data to be moved, one or more tracks must be readied, and a correct value must
be stored for the In and Out points. If you attempt to enter data when all tracks are safe,
all track indications and "Select Track!" indication on the display will blink to warn you.
If a correct value is not set for the Clipboard In or Out points, a warning message of “Void
In Point!” or “Void Out Point!” will appear.
* Refer to page "85" for more information about the Copy & Paste, and Move & Paste operation.
31. Copy key [COPY]
This key is used to copy data stored in the memory using the CLIPBOARD IN/OUT keys.
Pressing the COPY key will store the data in the Clipboard as Copy data. To execute the
copy operation, one or more tracks must be readied, and a correct value must be stored
for the In and Out points. If you attempt to copy data when all tracks are safe, all track
indications and a "Select Track!" indication on the display will blink to warn you.
If acorrect value is not set for the Clipboard In or Out points, a warning message of “Void
In Point!” or “Void Out Point!” will appear.
* Refer to page "85" for more information about copying data.
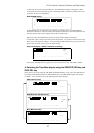
32. Auto Punch Mode On/Off key [AUTO PUNCH]
Switch this key ON for auto punch in/out.
When you press this key while a correct value is stored to the AUTO PUNCH IN key and the
AUTO PUNCH OUT key, both the REHEARSAL LED and TAKE LED will blink, indicating that
Auto Punch mode is on. (If a correct value is not stored, pressing the AUTO PUNCH key
will not turn the parameter ON, and the message “Void Out Point!” will appear.)
Pressing the PLAY button under this condition will put the unit into "Rehearsal mode" for
Auto Punch In/Out recording. Pressing the PLAY button and RECORD button simultaneously
will put the unit into "Take mode."
There are five combinations of the REHEARSAL LED and TAKE LED that indicate the status
of the unit regarding auto punch recording:
<Note>
If a correct value is not stored, pressing the AUTO PUNCH key will not enable the function,
and the message “Void Out Point!” will appear.
If a correct value is not stored, pressing the AUTO PUNCH key will not turn on the function, and the
message “Void Out Point” will alert you. In this case, set a correct value for the Auto Punch In/Out point.
Also, the function is not turned on when you press the AUTO PUNCH key if the disk does not have
enough recording space. The display will indicate “-**h**m**s**f Over.”
Auto Punch mode OFF Both REHEARSAL LED and TAKE LED are off.
Auto Punch mode ON Both REHEARSAL LED and TAKE LED are blinking.
Auto Punch Take mode Only the TAKE LED (red) is lit.
Auto Punch Rehearsal mode Only the REHEARSAL LED (green) is lit.
Rehearsal mode entered by Only the REHEARSAL LED (green) is blinking.
means of MMC or foot switch
* Refer to page "75" for more information about the Punch In/Out.