


D-160 Owner's manual (SETUP mode)
165
2-22. Loading Song Data (“Load PGM?”)
Prior to loading externally saved song data back on to the D-160 internal hard disk drive,
this mode allows you to choose which DAT, adat or SCSI port will be used.
* See page "102" “Saving/Loading Song Data” for details of Loading Song Data.
* Available setting : adat, DAT, SCSI
* Available program : P1 ~ P99 or ALL (In the case of SCSI only)
* You can load one program or all the programs (in the case of SCSI only).
1. Press the DISP SEL key and choose the flashing SETUP mode on the display.
Then, press the EXECUTE/YES key. The SETUP display will stop flashing.
2. With the JOG dial, choose “Load PGM?”.
The “?” display will start flashing.
3. Press the EXECUTE/YES key.
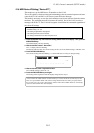
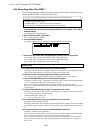
The display will show “LOAD”.
The display will also show the current setting. In the case of initial setting, it will show “DAT”.
44.1kHz
SETUP
LOAD
91011121314151687654321
42
OL
0
30
24
18
12
9
6
3
∞
_
4. With the JOG dial, choose which type digital signal you want to use to load song data.
If you choose “adat”, the song data will be loaded via adat digital signal.
If you choose “DAT”, the song data will be loaded via SPDIF digital signal.
If you choose “SCSI”, the song data will be loaded via SCSI.
Load from “DAT”
5-a. Choose DAT with the JOG dial and press the EXECUTE/YES key.
The display will show “LOAD” and be flashing “SURE?”. The display will also start flashing the
currently chosen load target program number on the internal hard disk drive, which you are
loading the song data back on to.
6-a. With the JOG dial, choose the program number onto which you want to load on to.
You can choose any program available on the internal IDE drive to load song data on to.
If you want to load the data onto a new program rather than the program already available,
choose “New PGM” at this stage.
7-a. Press the EXECUTE/YES key. The display will show “LOAD” .
The display will also start to show the menu from which you can choose the tracks you want to
load on to. Choose the setting with the JOG dial.
The available loading track settings are ;
1-8, 1-16, 1-24, 9-16, 9-24, 17-24. We recommend you choose the loading tracks in the same
way as when you saved the data.
8-a. Press the EXECUTE/YES key after you have chosen the tracks you want.
The display will start flashing “SURE?”.
9-a. Press the EXECUTE/ YES key once again.
The display will show “Play DAT!”. This means the D-160 is asking you to start playing back the
DAT machine connected to the D-160, which has a tape recorded with the song data.
10-a. Start playing back the DAT.
The display will start showing “REMAIN”.
In few seconds, the D-160 will recognizes the pilot signal from the DAT. The display will then
start showing the program number you are loading the data to and the count down time display
indicating how long the load process is going take. The D-160 has now started loading the data.
The actual load process starts at the moment the display starts showing the count down time.
Loading from DAT is done via using a pair of stereo signals one after the other, e.g. 1-2 then 3-4
then....23-24. While loading, the D-160 will display track 1 and 2 indicators flashing with their
level meters moving.