


D-160 Owner's manual (SETUP mode)
163
2-20. Event Number Check on Each Track (“NOs Of Event?”)
This mode allows you to check event numbers on each recorded track individually.
As we have described in the “Before Operation” section, each recorded track data (TRK 1
~ 24) on a program is made up with the Audio Files and 0 Files.
The event number is calculated by adding these two types of Files.
The D-160 is able to carry up to 512 events per track. When the event numbers exceed
508, the D-160 will no longer be able to record new data. This situation is called “event
over”.
For an ordinary song length, about 6 minutes, however intense the editing process is,
you should never experience an event over problem.
This is because the D-160 automatically tries to optimize the disk management system as
much as possible so that the event numbers are always kept minimum.
However, you need to be careful in certain circumstances as:
* when recording short lengths of audio bit by bit in many separate places.
* when taking advantage of a D-160 feature in which you can record wherever
you like within the 24 hours in ABS.
* when doing lot of editing on a very long mono track recording.
This mode is especially useful to check the data stored in the virtual tracks as the data
transferred to virtual tracks cannot be seen.
1. Press the DISP SEL key and choose the flashing SETUP mode on the display. Then, press the
EXECUTE/YES key.
The SETUP display will stop flashing.
2. With the JOG dial, choose “NOs Of Event?”.
The “?” display will start flashing.
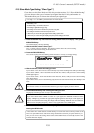
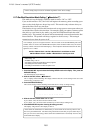
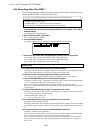
3. Press the EXECUTE/YES key.
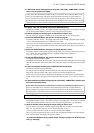
The display will show the actual event number of track one.
44.1kHz
SETUP
91011121314151687654321
42
OL
0
30
24
18
12
9
6
3
∞
_
Displayed a current
Event Number
4. By turning the JOG dial, the display will show the track numbers one after the other so that you
can check the event number on each track.
5. Press the EXIT/NO key or STOP button to quit the SETUP mode.
* Press either the STOP button or EXIT/NO key to return from the second step menu to the
first or to quit SETUP mode. The menu will go backwards each time you press either key so
that you can correct the setting, choose some other SETUP mode or eventually return to
the normal time base display.
* For details on audio files and events, refer to "2. Audio File and Event" in "Before operating."