


D-160 Owner's Manual (Punch In/Out)
81
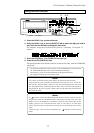
SHIFT
AUTO
CLIPBOARD PLAY
LOCATE ABS 0
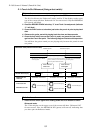
DIGITAL MULTITRACK RECORDER
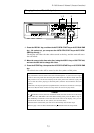
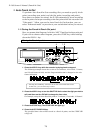
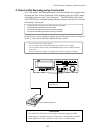
D-160
IN / OUT
PUNCH
PGM CHANGE
8/167/156/145/134/123/112/101/9
RECORD TRACK
HD ACCESSLOCKED MTC IN
ENDIN OUTSTART
AUTO PUNCH
AUTO PLAY IN OUT
AUTO RTN
CLIPBOARD
PASTEMOVECOPY
AUTO RTN
ERASE UNDO REDO
DISP SEL
EXECUTE
/YES
EXIT
/NO
HOLD/ STORE RECALL
TIME BASE SEL
TAK E
REHEARSAL
LOCATEPUNCH
F FWDREWINDPLAYSTOPRECORD
VARI PITCH
LOCATE ABS END
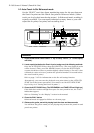
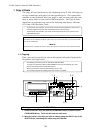
FOOT SWITCH Model 8051
2. Punch In/Out Recording using a foot switch
The "Take mode" and "Rehearsal mode" are also available in this application.
Pressing the foot switch repeatedly while holding down the STOP button
will toggle between "take" and "rehearsal." The REHEARSAL LED of the
AUTO PUNCH key will blink during Rehearsal mode, and the LED will turn
off during "Take mode."
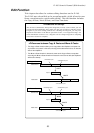
1. Select the track onto which you wish to punch in/out record.
2. Start playback just before the punch in point.
3. Press the foot switch when you want to start recording.
4. Press the foot switch again when recording is finished.
In this lesson, we are going to replace part of the guitar solo recorded on
Track 3, as we did in the Auto Punch In/Out section.
* Set the D-160 to the default setting.
* Use an optional foot switch Model 8051 for punch in/out recording.
* Set Auto Punch mode to OFF. (The REHEARSAL LED and the TAKE LED will be
turned off.)
* Do not change the Program or sampling rate until the session is complete.
<CAUTION>
Turn off the D-160 before connecting or disconnecting any cables.
Connecting or disconnecting the footswitch or detachable controller
cables while the D-160 is turned on will cause it to malfunction.
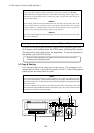
OFF (REHEARSAL LED/TAKE
LEDs will go off.)