


D-160 Owner's Manual (Edit function)
99
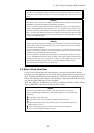
3-3. How to Erase data in its entirety from a specified point up to ABS END:
Storing the erase start point (Auto Punch In point) and the erase end point (Auto Punch Out point)
Refer to “1. Storing memory data,” to set the Auto Punch In/Out points.
Again, we use the procedure to “edit the stored data.”
7
1
9
1, 4
2
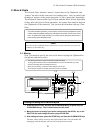
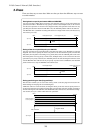
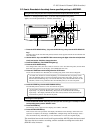
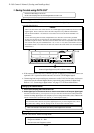
1. Press the AUTO PUNCH IN key. (Or, press the RECALL key, then press the AUTO PUNCH IN
key.)
The time value of the Auto Punch In point (bar/beat/clock) appears and the D-160 will enter the
data edit mode.
2. Use the HOLD/> key or the SHUTTLE dial to move among the digits of the time value (bar/beat/
clock), and use the JOG dial to change the value.
3. Press the STORE key. (The STORE LED lights up.)
4. Press the AUTO PUNCH IN key.
The changed time value (bar/beat/clock) is stored as a new Auto Punch In point, and the Time
Base indication appears on the display. (The STORE LED turns off.)
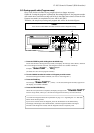
5. Press the F.FWD button while holding down the STOP button.
The D-160 will indicate the ABS END (the recording end) point of the selected Program.
* To make sure the data is erased completely, we recommend that you specify a time
after the ABS END point as an erase end point (Auto Punch Out point). To do so, press
the PLAY button following Step 5 so that the ABS time passes the ABS END time. Use the
ABS time, which is now positioned after the ABS END point, as an erase end point.
6. Press the STORE key, then the AUTO PUNCH OUT key.
The ABS END point is stored as a new Auto Punch Out point.
* To check the Auto Punch In/Out points, press the AUTO PUNCH IN/OUT keys
respectively. Or, press the RECALL key, then press the AUTO PUNCH IN/OUT keys
respectively. The display will indicate the time value (bar/beat/clock) stored for the
Auto Punch In point or Auto Punch Out point.
Executing the erase operation
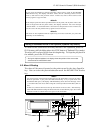
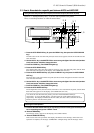
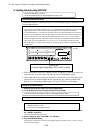
7. Press the RECORD TRACK select key for a track you wish to erase (up to 16 tracks) so that the
corresponding track(s) enters “READY” mode.
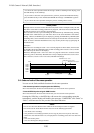
8. Press the ERASE key.
The message “Erase” appear on the display, and “SURE?” will flash.
9. Press the EXECUTE/YES key.
This executes the erase operation. The display will indicate “Wait Erasing!”. When the erase
operation is complete, the message “COMPLETED!” will light along with the message “Erase.”
Press the EXIT/NO key, DISP SEL key, or the STOP button to restore the original display.
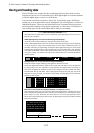
The sound data between the Auto Punch In point and the ABS END point has been erased.
This area does not contain a recording, and the available recording time on the disk
(REMAIN value) increases.
6
3, 6
5
8
SHIFT
AUTO
CLIPBOARD PLAY
LOCATE ABS 0
DIGITAL MULTITRACK RECORDER
D-160
IN / OUT
PUNCH
PGM CHANGE
8/167/156/145/134/123/112/101/9
RECORD TRACK
HD ACCESSLOCKED MTC IN
ENDIN OUTSTART
AUTO PUNCH
AUTO PLAY IN OUT
AUTO RTN
CLIPBOARD
PASTEMOVECOPY
AUTO RTN
ERASE UNDO REDO
DISP SEL
EXECUTE
/YES
EXIT
/NO
HOLD/ STORE RECALL
TIME BASE SEL
TAKE
REHEARSAL
LOCATEPUNCH
F FWDREWINDPLAYSTOPRECORD
VARI PITCH
LOCATE ABS END