


D-160 Owner's Manual (Names and Functions)
21
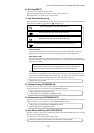
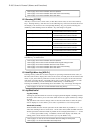
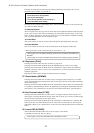
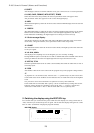
Auto Punch In/Out mode
Punch In/Out mode
Rehearsal
Take
Rehearsal
Take
Punch In/Out mode and LED display
Manual Punch In/Out using a
footswitch or MMC. (Auto
Punch mode OFF.)
:go off
:light up
:blink
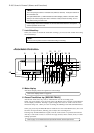
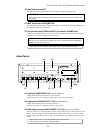
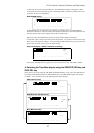
33. Locate key [LOCATE]
Press this key to locate a position.
You can locate a point (memory data) (time, or bar/beat/clock) stored in the Memory
keys when you press a Memory key (CLIPBOARD IN, CLIPBOARD OUT, AUTO RTN START,
AUTO PUNCH IN, AUTO PUNCH OUT, or AUTO RTN END), and then press the Locate key.
Data stored in the Locate key is the most-recently located position expressed as a time
value (bar/beat/clock). If you wish to locate the same point repeatedly, then press this
key repeatedly. If you locate a position at a different time value or bar/beat/clock value,
the data will be updated. Pressing the RECALL key, and then the LOCATE key will display
the data stored in the LOCATE key (time or bar/beat/clock), and put the D-160 in the
data edit mode. To edit the data, use the HOLD/> key or the SHUTTLE dial to move around
the digits, and then use the JOG dial to change their value.
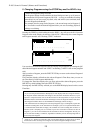
When you finish editing the data, you can store a particular locate point by pressing the
STORE key, and then the LOCATE key. You can also store a locate point by pressing the
STORE key, and then the LOCATE key while the recorder’s current point is shown.
Also, pressing the HOLD/> key to enter data edit mode, and then pressing the LOCATE
key when you finish editing, will allow you to locate the edited position (bar/beat/clock)
directly. This data can be stored individually to each Program P1-P99.
In the SETUP mode, you can also save and load the song data to and from each Program
individually. The data will be retained after you turn off the power to the unit.
* Refer to page "67" for more information about the Locate function.
34. Record button [RECORD]
Pressing only this button places the readied tracks into input monitoring status.
Pressing this button again will reset the tracks to playback monitoring. (The RECORD LED
will blink when the readied tracks are in input monitoring status.)
Pressing the PLAY button while holding down this button will place the readied tracks
into recording. At this time, the PLAY LED and RECORD LED will light, and the readied
track indication will be light steadily (instead of blinking).
* Refer to page "37" of the "Before Operating" section for more information about input
monitoring and reproduce monitoring.
35. Stop button [STOP]
Pressing this button will stop the transport section of the recorder.
Pressing the PLAY, REWIND, or F FWD button while holding down this button will cause
the D-160 to perform the following operation:
STOP + PLAY Clipboard playback (The STOP LED will flash and the PLAY LED will
light up.) *3
STOP + REWIND Locate ABS 0 *4
STOP + F FWD Locate ABS END *5
AUTO
TAKE
REHEARSAL
PUNCH
AUTO
TAKE
REHEARSAL
PUNCH
AUTO
TAKE
REHEARSAL
PUNCH
AUTO
TAKE
REHEARSAL
PUNCH
AUTO
TAKE
REHEARSAL
PUNCH
AUTO
TAKE
REHEARSAL
PUNCH