


D-160 Owner's Manual (Punch In/Out)
79
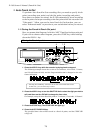
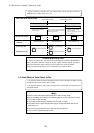
REHEARSAL LED
TAKE LED
RECORD button LED
PLAY button LED
3
Blink
3
Light up
3
Blink
AUTO PUNCH IN point
AUTO PUNCH OUT point
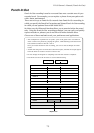
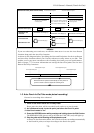
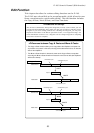
Rehearsal mode (Auto Punch In/Out)
Only track 3 enters INPUT monitoring
status. (However, the D-160 will not
record and data in Rehearsal mode.)
All tracks are under REPRO
monitoring status.
All tracks are under REPRO
monitoring status.
RECORD TRACK display
REHEARSAL LED will light up.
REHEARSAL LED will light up.
REHEARSAL LED will light up
PLAY LED will light up
PLAY LED will light up
RECORD LED will blink
PLAY LED will light up
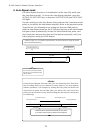
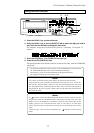
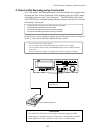
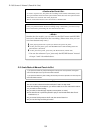
<Hints>
If you are rehearsing over and over, an effective time-saver is to use the Auto Return
function along with the Auto Play function.
As shown in the diagram below, specifying the Start and End points for the Auto Return
and Auto Play functions allows you to easily rehearse as many times as you like. This
enables you to pay more attention to the recording level and your own performance.
Refer to pages "71" for more information on setting the Start/End points for the Auto
Return/Auto Play functions.
AUTO RTN START point
AUTO PUNCH IN point
AUTO PUNCH OUT point
AUTO RTN END point
Rehearsal will be repeated automatically as many times as
you like to make it easier to adjust the recording level.
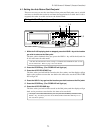
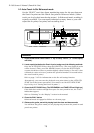
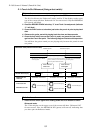
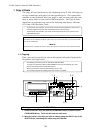
1-3. Auto Punch In/Out Take mode (actual recording)
Proceed to recording after rehearsal.
Take
1. Check to see which tracks are in ready mode.
Please note that data will be recorded in all tracks set to ready mode.
2. As in Rehearsal mode, locate the point just before the Punch In point.
3. Auto Punch mode is "on".
4. Press the RECORD button while pressing and holding down the PLAY button.
The REHEARSAL LED (green) will go off and the TAKE LED (red) will light up.
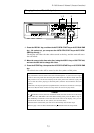
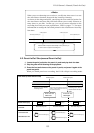
5. Play the guitar while listening to the playback sound.
As shown in the illustration below, the recorder will start recording automatically
at the Punch In point, and stop recording at the Punch Out point.
PLAY
PLAY
PLAY
RECORD