


About connection and login methods
Issue 9.1 June 2006 79
About Avaya Site Administration
A single license for Avaya Site Administration is included with the Standard Integrated
Management package.
Configuring Avaya Site Administration
When Avaya Site Administration is initially installed on a client machine, it needs to be
configured to communicate with Communication Manager on the S8300 Media Server.
When it runs initially, after downloading, you need to create a new entry for the switch
connection. To create new entries for the switch, follow the procedure To Add an S8300 Switch
Administration Item on page 79.
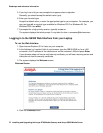
To Add an S8300 Switch Administration Item
1. Click File > New > Voice System.
The system displays the Add Voice System window.
2. Enter a name in the Voice System Name: field.
As a technician configuring Avaya Site Administration on your laptop, use a generic name,
because you will be able to use this connection name for all S8300 Media Servers.
3. Click Next.
The Connection Type dialog box displays.
4. Click the Network connection radio button.
5. Click Next.
The Network Connection dialog box displays.
6. Enter the IP address used to connect to the S8300.
7. Click Next.
The Network Connection/Port Number dialog box displays.
8. in the TCP/IP Port Number: field, type the appropriate port number.
Use port 23 for the craft login. Use port 5023 for the cust login.
9. Click Next.
The Network Connection/Timeout Parameters dialog box displays. Leave the default
values for the timeout parameters.
10. Click Next.
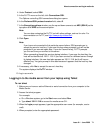
The Login Type dialog box displays.
11. Click the “I want to login manually each time” radio button.