


114 C2630M-C (7/09)
Setting Up the DX8100
Only a single user with Administrator or Power User access is allowed to access a DX8100’s Setup mode at one time. When connected to a
network supporting multiple HVRs and clients, users with Administrator access override and block Power Users. If two users with the same
access level attempt to enter Setup mode simultaneously, the DX8100 will allow access to setup features on a first-come, first-served basis.
Unavailable setup options will be grayed out.
This section describes the Setup Mode and includes the following topics:
• Accessing the Setup Mode
• Understanding the Setup Dialog Box on page 115
• Camera Setup on page 116
• IP Camera Setup on page 122
• Link Setup on page 132
• Schedule Setup on page 143
• Setting Up Network Properties on page 168
• Data Backup Setup on page 201
• User Setup on page 208
• Site Setup on page 214
• System Setup on page 218
• External Monitor Setup on page 228
• Emergency Notification Setup on page 235
• Emergency E-Mail Notification Setup on page 238
ACCESSING THE SETUP MODE
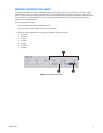
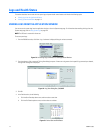
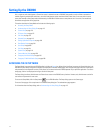
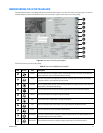
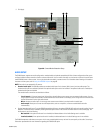
The Setup Mode is accessed from the DX8100 toolbar by clicking the Setup icon. When clicked, the Setup icon opens the Setup dialog box in the
DX8100 view panel. Major configuration categories are displayed on individual tabbed pages. Each configuration page contains all of the options
and parameters for the respective functions, which allows you to customize how the DX8100 operates for your particular application. To access a
setup page, click the icon displayed on the right side of the view panel.
The Setup dialog box allows Administrators and Power Users access to the DX8100’s setup functions. However, only Administrators can define
user names and passwords for new users.
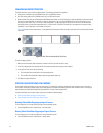
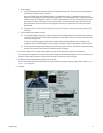
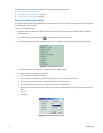
To access the Setup Mode, click the Setup button on the DX8100 toolbar. The Setup dialog opens to the Camera page.
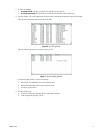
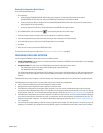
To access a Setup page, click a setup button in the DX8100 Setup dialog box. The selected setup page appears.
For information about the Setup dialog, refer to Understanding the Setup Dialog Box on page 115.