


224 C2630M-C (7/09)
Exporting Log Information
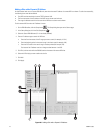
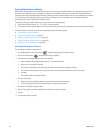
To export a system log file:
1. On the DX8100 toolbar, click the Setup button . The Setup dialog box opens to the Camera page.
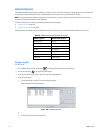
2. Click System button . The System page is displayed.
3. In the Choose drop-down box, select a log file.
4. Click Save As.
5. Select the drive and folder in which you want to store the log file.
6. Enter a filename for the log information in the space provided.
Log file names follow standard Windows file-naming conventions. Alternately, you can view log files by clicking View > Log and then
selecting the desired log file. Log files can be opened and printed using a text editing program, such as Windows Notepad.
7. Click Save.
SELECTING THE LANGUAGE
English is the default language for the DX8100 interface; although the system supports multiple languages, language changes must be
configured from both the HVR’s operating system and within the DX8100 application.
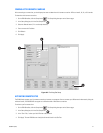
To select the appropriate language for your location:
1. On the DX8100 toolbar, click Setup button . The Setup dialog box opens to the Camera page.
2. Click the System button . The System page is displayed.
3. Make sure the HVR operating system's regional and language settings have been properly set up. Refer to the installation manual for
information about regional setup.
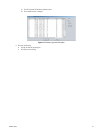
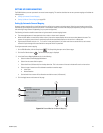
4. In the Language section, select the following appropriate language from the Select Language drop-down box.
•English
•French
•German
•Italian
• Polish
• Portuguese
•Russian
• Spanish
5. Click Update. The Restart dialog box opens.
6. Click Yes. The changes are applied and the DX8100 restarts.
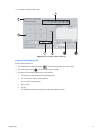
SETTING THE SYSTEM TIME
Be sure to set the system time before using the DX8100; setting the internal clock for each HVR on the network ensures that each unit accurately
reflects the local time.
This section describes how to set the DX8100 system time and includes the following topics:
• Setting System Time
• Working with Standard and Daylight Saving Time on page 225