


168 C2630M-C (7/09)
SETTING UP NETWORK PROPERTIES
The DX8100 networking capability allows you to network up to five DX8100s. You can configure such networking options as follows:
• Configuring the DX8100 for Network Access
• Setting Up DHCP
• Setting Up a Static IP Address
• Setting Up TCP/IP and Bandwidth Throttle
• Setting Up DNS/WINS
• Working with Time Synchronization on page 172
• Setting Up COM1 Port Properties
This section describes how to set up DX8100 network communication and includes the following topics:
• Configuring the DX8100 for Network Access on page 168
• Setting Up TCP/IP and Bandwidth Throttle on page 170
• Working with Multicasting on page 170
• Accessing Network Information on page 171
• Setting Up DNS/WINS on page 172
CONFIGURING THE DX8100 FOR NETWORK ACCESS
Using the TCP/IP protocol, up to five DX8100 Series HVRs can be networked for remote viewing and management. In addition, up to five
simultaneous computer, Web, and mobile clients can connect to each HVR. The DX8100 Series HVR supports both static IP addressing and
dynamic addressing through DHCP. Consult your network administrator for more information about IP address configuration.
The system must be turned on and connected to a secured private network, and you must be logged in with either Power User or Administrator
access to configure network software settings. You must reboot the HVR for any network configuration changes to take effect.
This section describes how to setup network access and includes the following topics:
• Setting Up DX8100 Network Access
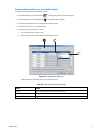
• Setting Up DHCP on page 169
• Setting Up a Static IP Address on page 170
Setting Up DX8100 Network Access
To begin the network setup process:
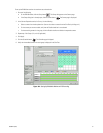
1. On the DX8100 toolbar, click the Setup button . The Setup dialog opens to the Camera page.
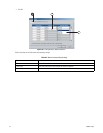
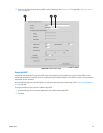
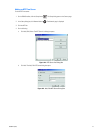
2. In the Setup dialog box, click Network button . The Network page is displayed.
3. Click the Network tab if it is not already selected.
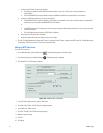
4. Enter a new name for your HVR in the Site Name box. (Site names can be up to 30 characters in length; the default site name is DX8100.)
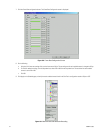
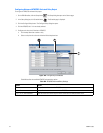
5. Enter a unique System ID for your HVR in the System ID field. (System IDs must start with a letter, be 15 characters or less, and not include
spaces or special characters.)
Your HVR’s site name is used to identify your system to clients and other DX8100 servers. Your HVR’s system ID is used to uniquely identify
your system on a LAN. System IDs are required to prevent possible conflicts with other network devices.